
There are many reasons you, as a developer, might want to screenshot a webpage. For example, you may want to take regular screenshots of a website for monitoring or compliance purposes, generate images from dynamic HTML, CSS, and SVG, or create image previews of URLs for social media or your own directory of links.
When you deal with webpage screenshots, it's common to think you need to use JavaScript to interact with a web page to screenshot it. For example, you might think of writing a Node.js service that will accept REST requests for screenshots, process them, and return the screenshot. Granted, this is a possible solution, but it isn't straightforward!
This article will show you how to take screenshots of webpages in an ASP.NET Core application without JavaScript. First, you'll set up a Reading List Web API. Then, you'll see how you can use different NuGet packages to take screenshots of webpages from an ASP.NET Core application. You'll also learn to use the Urlbox library to take screenshots asynchronously.
Prerequisites
The code samples in this article are compatible with .NET 6. .NET 6 is the latest LTS version of .NET from Microsoft, which lets you write performant, cross-platform applications using a single codebase. Please download the .NET 6 SDK to follow along with the code samples.
Many code samples use Google Chrome to render and screenshot the web pages. While most libraries automatically download Chrome, it's best to manually install it before starting so that you have all the necessary dependencies to run the browser from code.
This tutorial also requires PowerShell 7.2 for some of the NuGet package setup scripts. PowerShell is a cross-platform task automation solution developed by Microsoft. You can download the latest version of PowerShell for your platform here.
You can find all the completed projects from this tutorial in this GitHub repository.
Setting Up the Project
To demonstrate taking screenshots in an ASP.NET Core application, you'll build a basic Reading List Web API. The API will let you save and retrieve URLs in your reading list. You'll also see how you can take screenshots of those URLs for link previews on your user interface.
You can download the starter code from this GitHub repository if you want to skip to taking screenshots in ASP.NET Core.
Create the Project
Open a new terminal window and navigate to the folder where you want to store your code. Next, run the following command to create a new ASP.NET Core Web API using the .NET CLI.
dotnet new webapi -o ReadingListApiWrite the IScreenshotService Interface
Interfaces make it easy to describe method headers without implementing them. You'll write an IScreenshotService interface to define the methods available to screenshot a web page. This interface will make it easy to update the application to use the different screenshot service implementations presented in this article.
Create a Services folder in the project directory. Then, create a Screenshot subdirectory in that folder. Next, create the file IScreenshotService.cs and paste in the code below:
IScreenshotService.cs
namespace ReadingListApi.Services.Screenshot
{
    public interface IScreenshotService
    {
        Task<byte[]> ScreenshotUrlAsync(string url);
    }
}
Create the IReadingListService Interface and Implement It
It's best practice to keep controller methods lightweight. To do this, you'll implement the Reading List API's logic in a service.
In the Services folder, create a ReadingList folder. Next, you'll make the model classes and service interface and class. Create Models and DTO (Data Transfer Object) folders inside the ReadingList folder. Inside the Models folder, create a ReadingItemModel class, which will store the URL in the database.
Create the file ReadingItemModel.cs with the following content:
namespace ReadingListApi.Services.ReadingList.Models
{
    public class ReadingItemModel
    {
        public Guid Id { get; set; }
        public string Title { get; set; }
        public DateTime Reminder { get; set; }
        public string Url { get; set; }
        public bool ScreenshotTaken { get; set; }
    }
}
Next, you'll create data transfer objects that you'll use for requests and responses in the REST API. First, create a ReadingItemDTO.cs file in the DTO folder. This DTO will return the details for an item in the database. Then, copy the following code into the new file named ReadingItemDTO.cs:
namespace ReadingListApi.Services.ReadingList.DTO
{
    public class ReadingItemDTO
    {
        public Guid Id { get; set; }
        public string Title { get; set; }
        public DateTime Reminder { get; set; }
        public string Url { get; set; }
        public bool ScreenshotTaken { get; set; }
    }
}
Make a new file in the DTO folder and call it ReadingItemCreateDTO.cs. This DTO will be the request object for creating a new item in the database. You can paste the following code into the file:
namespace ReadingListApi.Services.ReadingList.DTO
{
    public class ReadingItemCreateDTO
    {
        public string Title { get; set; }
        public DateTime Reminder { get; set; }
        public string Url { get; set; }
    }
}
Once you've created the necessary model and DTO objects, you'll need to write the service interface and implement it. To do this, create the file IReadingListService.cs in the ReadingList folder and copy the following code into it:
using ReadingListApi.Services.ReadingList.DTO;

namespace ReadingListApi.Services.ReadingList
{
    public interface IReadingListService
    {
        Task<Guid> CreateReadingItemAsync(ReadingItemCreateDTO readingItem);
        Task<byte[]?> GetReadingItemScreenshotAsync(Guid id);
        Task<IEnumerable<ReadingItemDTO>> ListReadingItemsAsync();
    }
}
Once you've created the interface, implement it by creating a ReadingListService.cs file and copying the following class code into it:
using ReadingListApi.Services.ReadingList.DTO;
using ReadingListApi.Services.ReadingList.Models;
using ReadingListApi.Services.Screenshot;

namespace ReadingListApi.Services.ReadingList
{
    public class ReadingListService : IReadingListService
    {
        private readonly List<ReadingItemModel> _readingItems = new();

        private readonly IScreenshotService _screenshotService;
        private readonly IConfiguration _configuration;

        public ReadingListService(IScreenshotService screenshotService, IConfiguration configuration)
        {
            _screenshotService = screenshotService;
            _configuration = configuration;
        }

        public async Task<Guid> CreateReadingItemAsync(ReadingItemCreateDTO readingItem)
        {
            // Create a new model for the reading item
            var model = new ReadingItemModel()
            {
                Id = Guid.NewGuid(),
                Reminder = readingItem.Reminder,
                Title = readingItem.Title,
                Url = readingItem.Url
            };

            // Determine where to save the screenshot
            var fileName = $"{model.Id}.png";
            var fullFilePath = Path.Combine(_configuration["ScreenshotsFolder"], fileName);

            // Take the screenshot
            var screenshotBytes = await _screenshotService.ScreenshotUrlAsync(readingItem.Url);
            await File.WriteAllBytesAsync(fullFilePath, screenshotBytes);

            // Update our model with the file name
            model.ScreenshotTaken = true;

            // Add the model to our "database"
            _readingItems.Add(model);

            return model.Id;
        }

        public async Task<byte[]?> GetReadingItemScreenshotAsync(Guid id)
        {
            // Try to get the item from the database
            var item = _readingItems.FirstOrDefault(x => x.Id == id);

            // Make sure we have selected a reading item record and that
            // a screenshot was taken. If no item was found or the screenshot
            // has not been taken, return null.
            if (item == null || item.ScreenshotTaken == false)
                return null;

            // Retrieve the screenshot and return it as a byte array.
            var fullFilePath = Path.Combine(_configuration["ScreenshotsFolder"], $"{item.Id}.png");
            return await File.ReadAllBytesAsync(fullFilePath);
        }

        public Task<IEnumerable<ReadingItemDTO>> ListReadingItemsAsync()
        {
            // Return all the reading items in the database
            return Task.FromResult(_readingItems.Select(x => new ReadingItemDTO()
            {
                Id = x.Id,
                Reminder = x.Reminder,
                Title = x.Title,
                Url = x.Url,
                ScreenshotTaken = x.ScreenshotTaken
            }));
        }
    }
}
Finally, register the ReadingListService implementation in the Program.cs file by adding this line after creating the builder variable. Further down in the same file, add code to create the screenshots folder if it doesn't already exist:
// ...
// Using our reading list service
using ReadingListApi.Services.ReadingList;

var builder = WebApplication.CreateBuilder(args);

// Add services to the container
builder.Services.AddSingleton<IReadingListService, ReadingListService>();

// ...

app.UseHttpsRedirection();

Directory.CreateDirectory(app.Configuration["ScreenshotsFolder"]);

// ...
Make sure you configure the ScreenshotsFolder in the appsettings.json file:
{
  // ..
  "ScreenshotsFolder": "<PATH TO SCREENSHOTS DIRECTORY>"
}
Set Up the ReadingListController
The last scaffolding step is to set up the ReadingListController class. This class will expose the actual endpoints in the REST API. In the Controllers folder, create a ReadingListController.cs file and paste in the following code:
using Microsoft.AspNetCore.Mvc;
using ReadingListApi.Services.ReadingList;
using ReadingListApi.Services.ReadingList.DTO;

namespace ReadingListApi.Controllers
{
    [ApiController]
    [Route("[controller]")]
    public class ReadingListController : ControllerBase
    {
        private readonly ILogger<ReadingListController> _logger;
        private readonly IReadingListService _readingListService;

        public ReadingListController(ILogger<ReadingListController> logger, IReadingListService readingListService)
        {
            _logger = logger;
            _readingListService = readingListService;
        }

        [HttpPost]
        public async Task<IActionResult> CreateReadingItemAsync(ReadingItemCreateDTO readingItem)
        {
            try
            {
                return Ok(await _readingListService.CreateReadingItemAsync(readingItem));
            }
            catch (Exception ex)
            {
                _logger.LogError("An error occurred while creating a reading item: {Exception}", new { Exception = ex });
                return StatusCode(StatusCodes.Status500InternalServerError, "An error occurred while creating a reading item");
            }
        }

        [HttpGet]
        public async Task<IActionResult> ListReadingItemsAsync()
        {
            try
            {
                return Ok(await _readingListService.ListReadingItemsAsync());
            }
            catch (Exception ex)
            {
                _logger.LogError("An error occurred while listing all the reading items: {Exception}", new { Exception = ex });
                return StatusCode(StatusCodes.Status500InternalServerError, "An error occurred while listing all the reading items");
            }
        }

        [HttpGet("{id}/screenshot")]
        public async Task<IActionResult> GetScreenshotAsync(Guid id)
        {
            try
            {
                var file = await _readingListService.GetReadingItemScreenshotAsync(id);

                if (file == null)
                    return NotFound();

                return File(file, "image/png");
            }
            catch (Exception ex)
            {
                _logger.LogError("An error occurred while retrieving the screenshot file: {Exception}", new { Exception = ex });
                return StatusCode(StatusCodes.Status500InternalServerError, "An error occurred while retrieving the screenshot file");
            }
        }
    }
}
Ensure that your controllers are registered in your program.cs by calling the builder service:
// Ensure this method is called
builder.Services.AddControllers();
builder.Services.AddEndpointsApiExplorer();
builder.Services.AddSwaggerGen();

var app = builder.Build();
Also ensure that your controllers are mapped before running the app:
Directory.CreateDirectory(app.Configuration["ScreenshotsFolder"]);
// Ensure this method is called
app.MapControllers();

app.Run();
You are now ready to start implementing screenshot functionality in your application.
Using PuppeteerSharp
The PuppeteerSharp NuGet package is a .NET port of the popular Node.js Puppeteer API. The package lets you use Google Chrome programmatically for various automation tasks, such as taking screenshots.
With a terminal open in the project folder, run the following command to install the package:
dotnet add package PuppeteerSharp --version 7.1.0You'll now implement the IScreenshotService interface using the PuppeteerSharp package. First, create a file called PuppeteerSharpScreenshotService.cs in the Services > Screenshot folder. Then, copy and paste the following code into the file:
using PuppeteerSharp;

namespace ReadingListApi.Services.Screenshot
{
    public class PuppeteerSharpScreenshotService : IScreenshotService
    {
        public async Task<byte[]> ScreenshotUrlAsync(string url)
        {
            // First download the browser (this will only happen once)
            await DownloadBrowserAsync();

            // Start a new instance of Google Chrome in headless mode
            var browser = await Puppeteer.LaunchAsync(new LaunchOptions()
            {
                Headless = true,
                DefaultViewport = new ViewPortOptions()
                {
                    Width = 1920,
                    Height = 1080
                }
            });

            // Create a new tab/page in the browser and navigate to the URL
            var page = await browser.NewPageAsync();
            await page.GoToAsync(url);

            // Screenshot the page and return the byte stream
            var bytes = await page.ScreenshotDataAsync();

            await browser.CloseAsync();

            return bytes;
        }

        private async Task DownloadBrowserAsync()
        {
            using var browserFetcher = new BrowserFetcher();
            await browserFetcher.DownloadAsync(BrowserFetcher.DefaultChromiumRevision);
        }
    }
}
The method above first downloads Google Chrome if it hasn't already been downloaded. It then creates a new browser instance with some launch options. Once the browser runs, the method creates a new page and navigates to the specified URL; when the page has loaded, the code takes a screenshot and closes the browser. Finally, the method returns the screenshot's raw bytes.
In the Program.cs file, register the PuppeteerSharpScreenshotService class so you can use it in the ReadingListService. Do this by adding the following line before the line that registers the ReadingListService class:
// ...

var builder = WebApplication.CreateBuilder(args);

// Add services to the container.
builder.Services.AddSingleton<IScreenshotService, PuppeteerSharpScreenshotService>();
builder.Services.AddSingleton<IReadingListService, ReadingListService>();

// ...
Start the application by running the following command in the terminal:
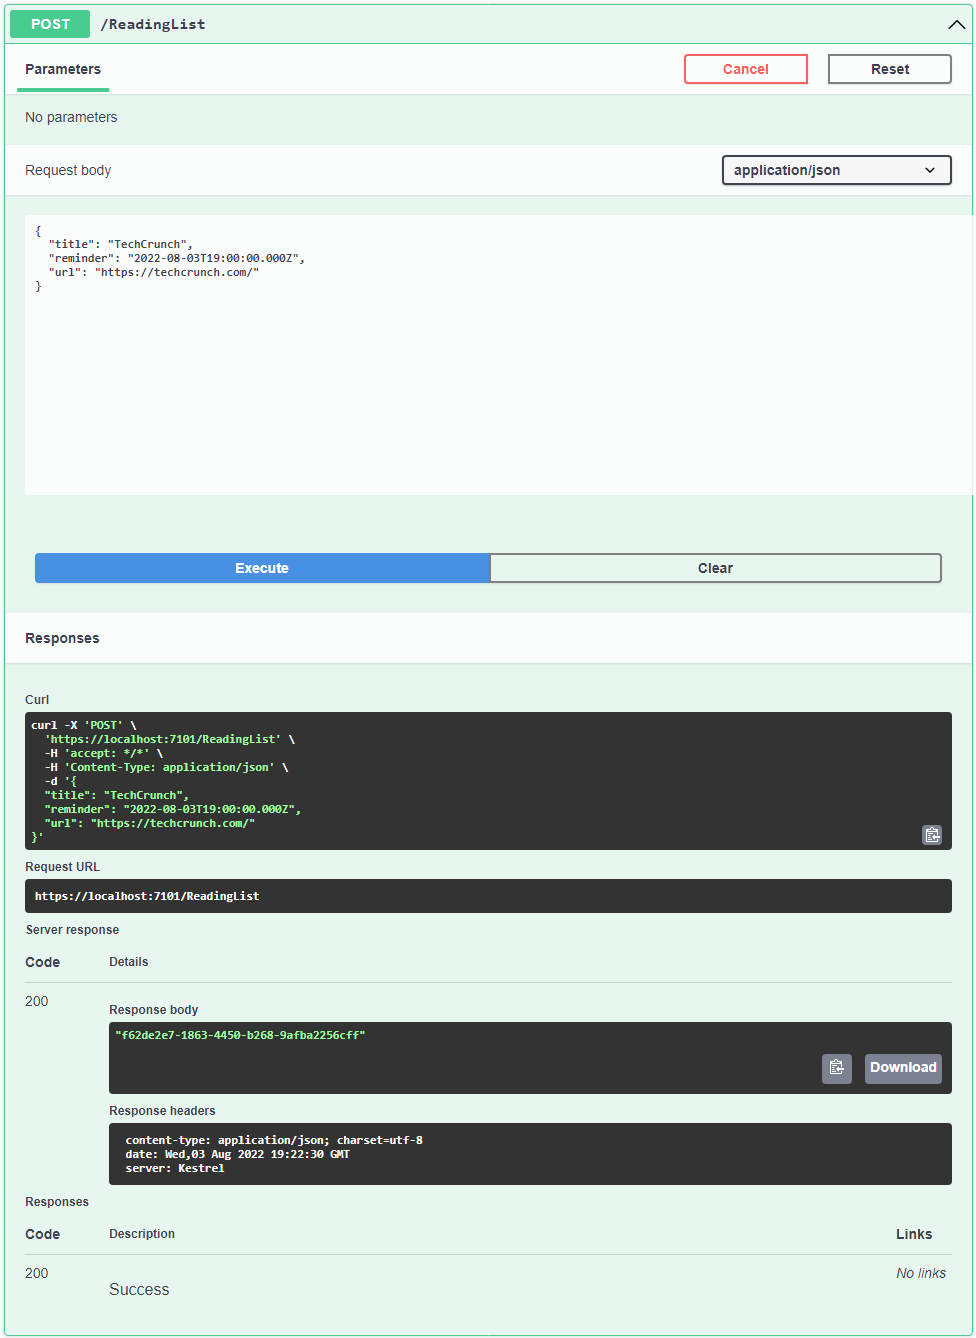
dotnet runYou can now run a POST request to /ReadingList. What we want to extract is the Unique ID (UUID) from the response, as we'll need that in the next step. After running a request to the below endpoint, you should see a screenshot saved in the folder you setup in your appsettings.json.
Here's a basic curl request (change the port as needed) or you can run this in Postman:
curl --location 'http://localhost:5021/ReadingList' \
--header 'Content-Type: application/json' \
--data '{
    "title": "TechCrunch",
    "reminder": "2025-02-05T19:00:00.000Z",
    "url": "https://www.techcrunch.com/"
}'
To Use swagger, open the Swagger page in a browser by going to https://localhost:<PORT>/swagger/index.html.
Add a new URL to your reading list on the Swagger page using the POST /ReadingList endpoint. The endpoint will save the object to the database, take a screenshot of the URL, and return the ID of the new reading item in the response.
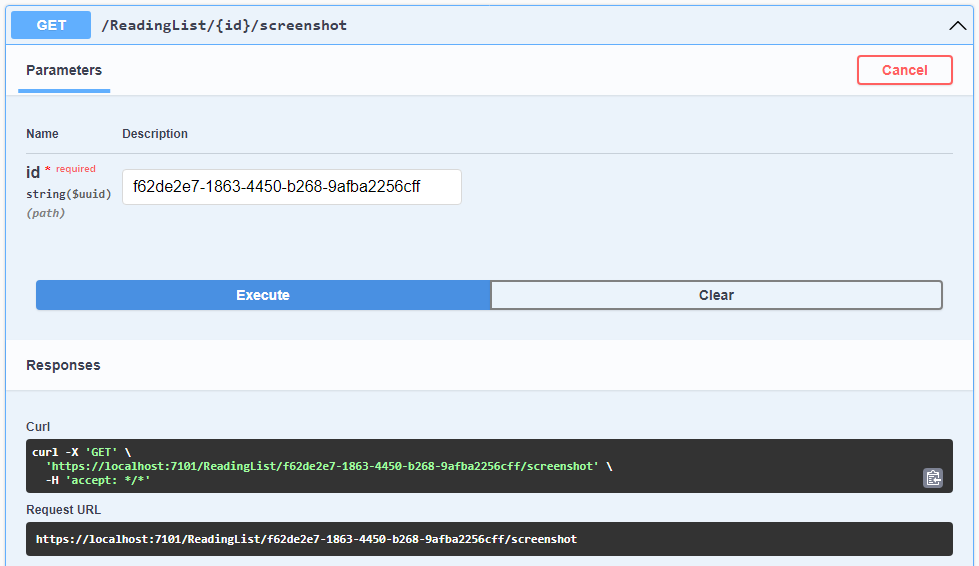
Copy the ID from the response object and use it in the GET /ReadingList/{id}/screenshot endpoint. This endpoint will retrieve the screenshot for the saved URL.
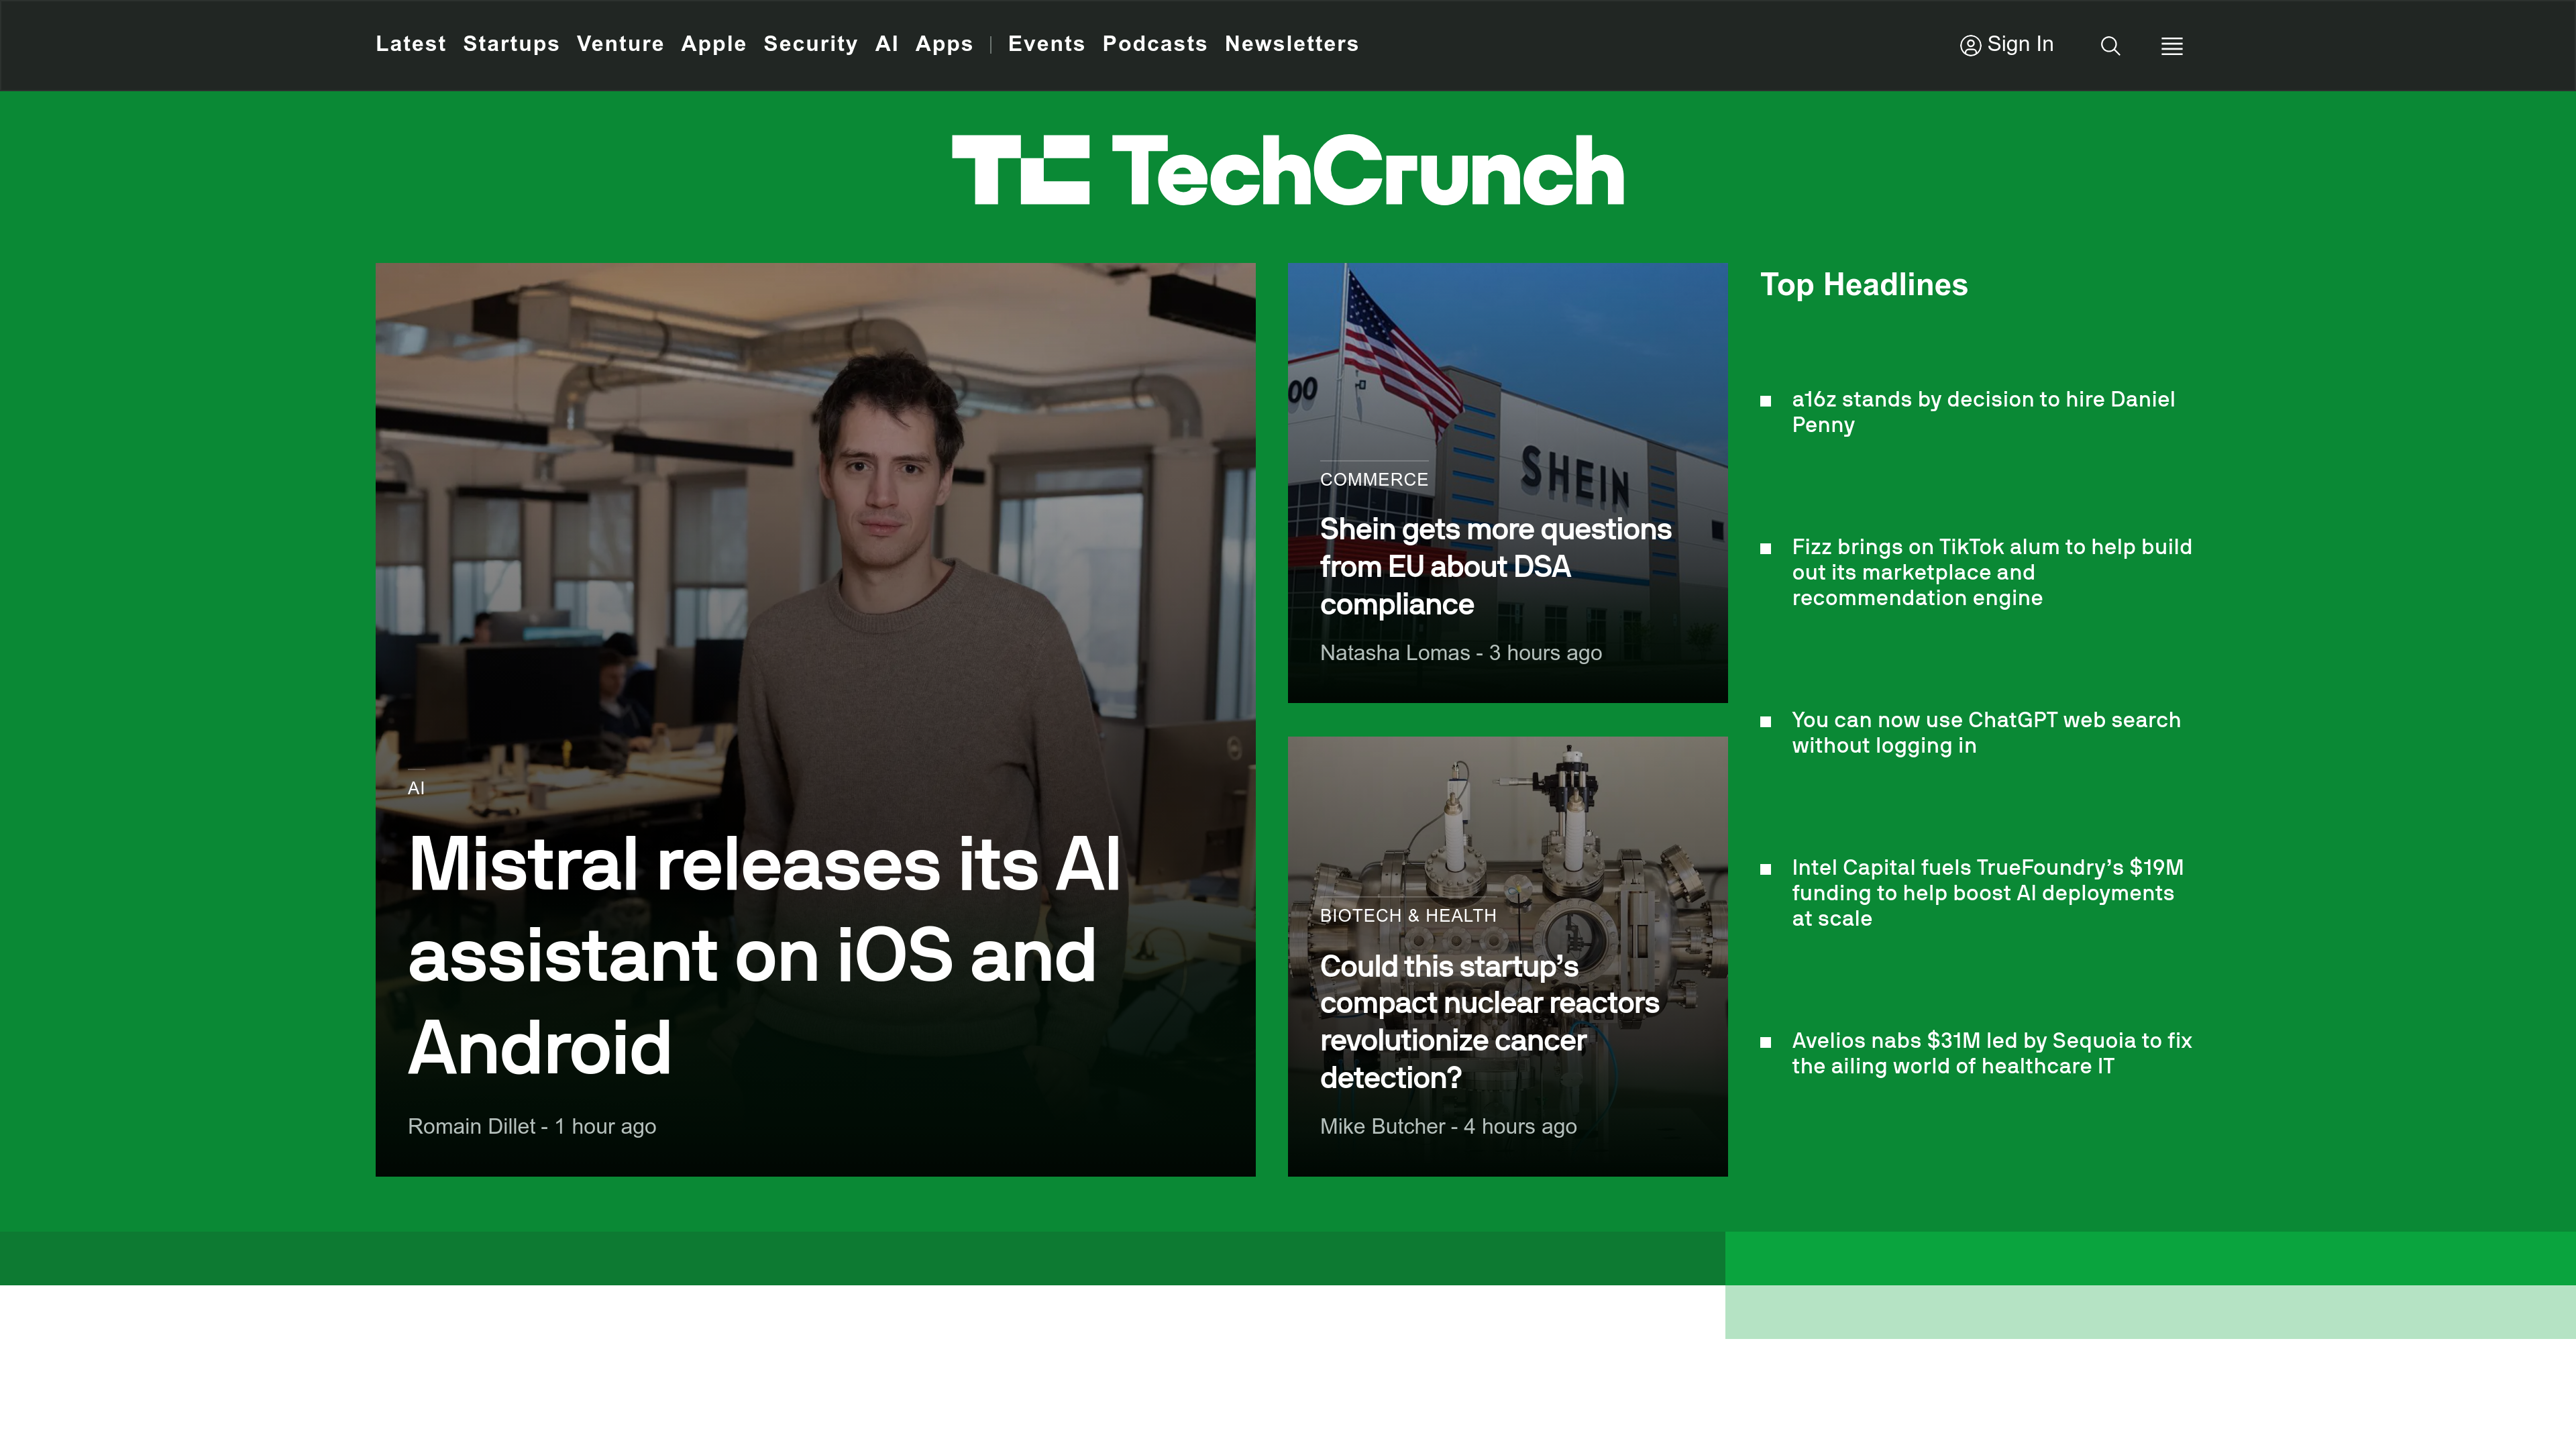
Below is a screenshot of the TechCrunch homepage taken with PuppeteerSharp:

The screenshot is appropriately sized and portrays the web page accurately. However, one immediate eyesore is the advertisements on the page's top. There is also a banner at the bottom of the web page, which looks unappealing.
Using Selenium
Selenium is a browser automation tool similar to PuppeteerSharp. However, unlike PuppeteerSharp, Selenium is compatible with several browser vendors, meaning you're not limited to using Chromium-based browsers. The Selenium WebDriver API enables the library to communicate with different browsers.
Run the following commands in the terminal. The first command installs the Selenium NuGet package. The second command installs a NuGet package that will assist in downloading the correct WebDriver to use with Chrome:
dotnet add package Selenium.WebDriver
dotnet add package WebDriverManager
Once you've installed the packages, create another class called SeleniumScreenshotService in the Services > Screenshot directory, and paste in the following code:
using OpenQA.Selenium.Chrome;
using OpenQA.Selenium;
using WebDriverManager;
using WebDriverManager.DriverConfigs.Impl;
using System.Drawing;

namespace ReadingListApi.Services.Screenshot
{
    public class SeleniumScreenshotService : IScreenshotService
    {
        public Task<byte[]> ScreenshotUrlAsync(string url)
        {
            // We need to download the correct driver for Chrome
            new DriverManager().SetUpDriver(new ChromeConfig());

            var options = new ChromeOptions();
            options.AddArgument("headless");

            // Use the driver to start a new instance of Google
            // Chrome
            var driver = new ChromeDriver(options);

            // Set the window size appropriately
            driver.Manage().Window.Size = new Size(1920, 1080);

            // Navigate to the specified URL
            driver.Navigate().GoToUrl(url);

            // Take a screenshot of the web page and return the
            // image's raw bytes
            var screenshot = (driver as ITakesScreenshot).GetScreenshot();
            var bytes = screenshot.AsByteArray;

            driver.Close();
            driver.Quit();

            return Task.FromResult(bytes);
        }
    }
}
The code first downloads the correct WebDriver for Chrome using the WebDriverManager package. It then creates a new window in Chrome and navigates to the specified URL. Once the website has loaded, the method takes a screenshot and receives the image's raw bytes. Finally, the browser is closed, and the raw bytes are returned.
In the Program.cs file, replace the line that registered the PuppeteerSharpScreenshotService with the following:
// ...

var builder = WebApplication.CreateBuilder(args);

// Add services to the container.
builder.Services.AddSingleton<IScreenshotService, SeleniumScreenshotService>();
builder.Services.AddSingleton<IReadingListService, ReadingListService>();

// ...
Rerun the application using the following command:
dotnet runNavigate to the Swagger page and follow the same process as before to save a new URL to the reading list and retrieve its screenshot. You should see an image similar to the one below if you saved the TechCrunch homepage:
The screenshot looks remarkably similar to the one taken with PuppeteerSharp. You'll notice that advertisements are still appearing on the page. The ugly bottom banner is also still visible.
Using Playwright
Playwright is a modern browser automation library developed by Microsoft. While it's designed primarily for end-to-end testing of web apps, you can also use it for browser automation tasks. Like Selenium, it supports multiple browser vendors with a single API.
In the terminal, run the following command to install the Playwright NuGet package:
dotnet add package Microsoft.PlaywrightAfter adding the package to the project, Playwright must complete its setup with a PowerShell script. To do this, build the project. Once built, run the PowerShell script and wait for it to finish:
dotnet build
pwsh bin\Debug\net6.0\playwright.ps1 install
In the Services > Screenshot folder, create a file called PlaywrightScreenshotService.cs and paste the following code in there:
using Microsoft.Playwright;

namespace ReadingListApi.Services.Screenshot
{
    public class PlaywrightScreenshotService : IScreenshotService
    {
        public async Task<byte[]> ScreenshotUrlAsync(string url)
        {
            // Create a new instance of Playwright
            using var playwright = await Playwright.CreateAsync();

            // Open a new instance of the Google Chrome browser in headless mode
            await using var browser = await playwright.Chromium.LaunchAsync(new() { Headless = true });

            // Create a new page in the browser
            var page = await browser.NewPageAsync(new()
            {
                ViewportSize = new() { Width = 1920, Height = 1080 }
            });
            await page.GotoAsync(url);

            // Screenshot the page and return the raw bytes
            return await page.ScreenshotAsync();
        }
    }
}
The Playwright implementation is the most straightforward code so far! The code first instantiates a new instance of Playwright. Next, the Playwright instance launches Chrome. Once the browser runs, a new page is created with the desired viewport dimensions and used to navigate to the specified URL. Finally, the method takes a screenshot and returns the raw bytes.
Update the Program.cs file to use the PlaywrightScreenshotService implementation of the IScreenshotService interface:
// ...

var builder = WebApplication.CreateBuilder(args);

// Add services to the container.
builder.Services.AddSingleton<IScreenshotService, PlaywrightScreenshotService>();
builder.Services.AddSingleton<IReadingListService, ReadingListService>();

// ...
Rerun the application:
dotnet runOpen Swagger and use the REST endpoints to save a URL and retrieve its screenshot. Below is an example of a screenshot of the TechCrunch homepage taken with Playwright.
Once again, the screenshot looks similar to the previous screenshots. The advertisements are still visible and the banner on the bottom also still blocks portions of the page. While this is easier to implement, the final screenshot has the same flaws as the previous screenshots.
Using Urlbox
Urlbox is a service that specializes in taking web page screenshots. The service exposes a REST API that's simple yet incredibly flexible. Their service offering includes advanced functionality such as retina screenshots, web font, and emoji support, SVG support, ad blocking, and webhooks. They offer a seven-day free trial to try all their features, after which you can upgrade to one of their paid plans.
Sign up for a seven-day free trial. You can log in after confirming your email address. When you log in, you'll be taken to the Dashboard page, where you'll find your API Key and Secret. You'll need these later, so be sure to take note of them.
To interact with Urlbox, we can utilise the Urlbox .NET SDK. The Nuget page is here.
Add the SDK to your project:
dotnet add package Urlbox.sdk.dotnet --version 2.0.1You'll now want to create a screenshot service implementation that uses Urlbox. To do this, create a UrlboxScreenshotService.cs file in the Services > Screenshot folder and paste in the following code:
using UrlboxSDK;
using UrlboxSDK.Options.Resource;

namespace ReadingListApi.Services.Screenshot
{
    public class UrlboxScreenshotService : IScreenshotService
    {
        private readonly IUrlbox _urlbox;

        public UrlboxScreenshotService(IUrlbox urlbox)
        {
            _urlbox = urlbox;
        }

        public async Task<byte[]> ScreenshotUrlAsync(string url)
        {
            UrlboxOptions options = Urlbox.Options(url)
            .Format(Format.Png)
            .Width(1920)
            .Height(1080)
            .BlockAds()
            .HideCookieBanners()
            .Retina()
            .ClickAccept()
            .HideSelector(".pn-ribbon")
            .Build();
            string image = await _urlbox.DownloadAsBase64(options);
            // The default Base64 string includes the content type
            // which .NET doesn't want
            // e.g. image/png;base64,XXXXXXXXXXXXXXX
            image = image.Substring(image.IndexOf(",") + 1);
            return Convert.FromBase64String(image);
        }
    }
}
The SDK uses the fluent builder pattern to make it easier to configure your options, where calling .Build() builds the final options object. Feel free to update this with any of the options the SDK provides. You can read more about these in the readme of the GitHub repository.
Update the Program.cs file to register the UrlboxScreenshotService.
// ...
var builder = WebApplication.CreateBuilder(args);

// Add Urlbox to the DI container
builder.Services.AddUrlbox(options =>
{
    options.Key = "YOUR_PUBLISHABLE_API_KEY";
    options.Secret = "YOUR_SECRET";
    // options.WebhookSecret = "your-webhook-secret"; // Optional
});

builder.Services.AddSingleton<IScreenshotService, UrlboxScreenshotService>();

builder.Services.AddSingleton<IReadingListService, ReadingListService>();

// ...
Make sure to replace the placeholders with your publishable API key and secret, and optionally the webhook secret. .AddUrlbox() allows you to define how your Urlbox instance is created in one place across your whole app. We highly recommend you don't hardcode your API keys, and instead use environment variables.
Lastly, run the application:
dotnet runUse the Postman Collection or Open Swagger in your browser and save a URL. Then, retrieve the screenshot and see the result. To demonstrate, if you took a screenshot of the TechCrunch homepage, you should see something similar to the image below:
The screenshot looks much better! You'll first notice that the ads are gone. The screenshot is also retina quality, resulting in superior image quality compared to the earlier screenshots. The banner at the page's bottom is also gone, thanks to the custom selector used in the code. Overall, this screenshot looks much better than the previous ones.
Using Urlbox with Webhooks
As a bonus exercise, you'll see how you can use webhooks with Urlbox to make API calls asynchronously. In other words, you can send a request for a screenshot without needing to wait for a response. Instead, Urlbox will send a JSON message to your specified webhook URL once the screenshot is complete.
This one is a bit more tricky, but you know what you're doing!
We'll need to expose 2 new POST endpoints, /withWebhook to send our request to and /webhook for Urlbox to send the JSON render response to.
Our flow will be that we send a request via postman/curl/swagger, just as we did before, but to the /withWebhook endpoint. This will make a request to Urlbox asynchronously, with an Url for Urlbox to send the response to. Urlbox returns a unique Render ID as part of its asynchronous call, so we will use that as our reading list item ID, to keep our 'database' in sync with the render result.
How do we expose this if we are working locally you ask? Sign up for Ngrok, which with a CLI command exposes a port on your localhost.
Once you've signed up and configured Ngrok, we can run the following, Exposing the port that your ASP NET server is running on, which you can find logged in your console when you run dotnet run.
ngrok http <YOUR_PORT>This should give you an endpoint like this:

Take that long URL on the left hand side which ends in ngrok-free.app so that we paste it in the code sample below, as that's where we'll want Urlbox to send the final render to. Leave ngrok running for now, as each time you rerun ngrok, it generates a new Url.
Let's implement the screenshotting method. Head over to the UrlboxScreenshotService.cs. In there we'll mimic our previous method of rendering a screenshot, but now calling the async method in the SDK and adding in our new ngrok endpoint to the options, making sure to keep the appended /ReadingList/webhook:
public async Task<AsyncUrlboxResponse> ScreenshotUrlWebhook(string url)
{
    UrlboxOptions options = Urlbox.Options(url)
    .WebhookUrl("https://3709-2a00-23c6-1a7f-c600-893e-193a-6b5c-f803.ngrok-free.app/ReadingList/webhook")
    .Format(Format.Png)
    .Width(1920)
    .Height(1080)
    .BlockAds()
    .HideCookieBanners()
    .Retina()
    .ClickAccept()
    .HideSelector(".pn-ribbon")
    .Build();
    AsyncUrlboxResponse response = await _urlbox.RenderAsync(options);

    return response;
}
This isn't DRY, but you're welcome to refactor as you wish! It will start a render, but not wait for the render to finish before responding. Checkout the documentation for more information on the different request types you can make to Urlbox.
Now we'll implement methods in our ReadingListService.cs to handle the incoming request from us, and the incoming webhook from Urlbox.
In the IReadingListService.cs lets add the interfaces required for these methods:
using ReadingListApi.Services.ReadingList.DTO;
using UrlboxSDK.Webhook.Resource;

namespace ReadingListApi.Services.ReadingList
{
    public interface IReadingListService
    {
        Task<Guid> CreateReadingItemAsync(ReadingItemCreateDTO readingItem);
        Task<byte[]?> GetReadingItemScreenshotAsync(Guid id);
        Task<IEnumerable<ReadingItemDTO>> ListReadingItemsAsync();

        // Add in these methods
        Task<Guid> CreateReadingItemAsyncWithWebhook(ReadingItemCreateDTO readingItem);
        Task<Guid> ProcessWebhook(UrlboxWebhookResponse response);
    }
}
Next, lets implement the two methods above. Head into the ReadingListService.cs and add this code:
public async Task<Guid> CreateReadingItemAsyncWithWebhook(ReadingItemCreateDTO readingItem)
{
    if (_screenshotService is UrlboxScreenshotService urlboxScreenshotService)
    {
        // Take the screenshot
        AsyncUrlboxResponse response = await urlboxScreenshotService.ScreenshotUrlWebhook(readingItem.Url);
        // Create a new model for the reading item
        var model = new ReadingItemModel()
        {
            // Set the ID to the Urlbox render ID so we can match it later
            Id = Guid.Parse(response.RenderId),
            Reminder = readingItem.Reminder,
            Title = readingItem.Title,
            Url = readingItem.Url
        };

        // Add the model to our "database"
        _readingItems.Add(model);

        return model.Id;
    }
    throw new Exception("Webhook processing not supported for this screenshot service.");
}

public async Task<Guid> ProcessWebhook(UrlboxWebhookResponse response)
{
    // Get the item from our 'database'
    var item = _readingItems.FirstOrDefault(x => x.Id == Guid.Parse(response.RenderId));
    if (item != null)
    {
        item.ScreenshotTaken = true;

        var fileName = $"{item.Id}.png";
        var fullFilePath = Path.Combine(_configuration["ScreenshotsFolder"], fileName);

        // Get the Screenshot and save it to our 'database'
        HttpClient client = new();

        Console.WriteLine("Found item under renderID, downloading image and saving...");
        HttpResponseMessage image = await client.GetAsync(response.Result.RenderUrl);

        if (image.StatusCode == System.Net.HttpStatusCode.OK)
        {
            await File.WriteAllBytesAsync(fullFilePath, await image.Content.ReadAsByteArrayAsync());
            Console.WriteLine("Image Saved.");
        }

        return item.Id;
    }
    else
    {
        Console.WriteLine("Item not found");
    }
    throw new Exception("Could not get reading list item.");
}
CreateReadingItemAsyncWithWebhook() takes our reading item from our POST request, just as before. We call the UrlboxScreenshotService method ScreenshotUrlWebhook() which returns an AsyncUrlboxResponse. This is an object the SDK provides, which has a RenderId on it as well as some other useful things. It's this render ID we will use to store the model for retrieval later.
ProcessWebhook() is the method that handles requests from Urlbox. It's going to be called by the controller's method triggered by the /webhook endpoint. It takes the finalised UrlboxWebhookResponse, and finds the item by the same Render ID Urlbox generated for us. It then takes the RenderUrl, which is the location in cloud storage where you can find your image, opens it and stores it in our 'database'. This location might be your S3 cloud storage location if you have it setup with Urlbox. If you're also saving side renders like html, metadata or markdown through use of the methods like .SaveMarkdown, the Url's for them will also be here, and you could refactor this code to store them too.
All the options and objects the SDK implements is in their API reference.
Let's finally add the two endpoint methods to the ReadingListController.cs:
// ... previous endpoints

[HttpPost("/withWebhook")]
public async Task<IActionResult> CreateReadingItemAsyncWithWebhook(ReadingItemCreateDTO readingItem)
{
    try
    {
        return Ok(await _readingListService.CreateReadingItemAsyncWithWebhook(readingItem));
    }
    catch (Exception ex)
    {
        _logger.LogError("An error occurred while creating a reading item: {Exception}", new { Exception = ex });
        return StatusCode(StatusCodes.Status500InternalServerError, "An error occurred while creating a reading item");
    }
}

[HttpPost("webhook")]
public async Task<IActionResult> ProcessWebhook([FromServices] IUrlbox urlbox)
{
    StreamReader stream = new(Request.Body, leaveOpen: true);
    try
    {
        UrlboxWebhookResponse verifiedResponse = urlbox.VerifyWebhookSignature(
            Request.Headers["x-urlbox-signature"],
            await stream.ReadToEndAsync()
        );
        Console.WriteLine("RESPONSE VERIFIED");
        Guid processedId = await _readingListService.ProcessWebhook(verifiedResponse);
    }
    catch (Exception ex)
    {
        Console.WriteLine($"Error verifying response: {ex.Message}");
    }

    return Ok();
}
Our new /withWebhook endpoint is practically the same as our previous create method, but just calls a different service method. This isn't DRY, and if you're using this code feel free to refactor this! It's just an example, not a prescription.
The method attached to /webhook does something more jazzy. It injects the urlbox instance we have (arguably not SOLID, but again, this is just an example) in the service layer, and validates that the content being sent is indeed from Urlbox. This can be quite a tedious process to implement manually, so the SDK takes out most of that thinking with a simple method. Checkout the documentation on webhooks or the source code for an in-depth understanding of what's going on under the hood.
Now for the pièce de résistance, we just need to add our webhook secret into the Urlbox instance. Head back into the Program.cs and add that bad boy in. You can find it on your dashboard's project settings underneath your publishable key and secret key under Webhook Secret:
// Add Urlbox to the DI container
builder.Services.AddUrlbox(options =>
{
    options.Key = "YOUR_PUBLISHABLE_API_KEY";
    options.Secret = "YOUR_SECRET";
    // This one!
    options.WebhookSecret = "NEQG6yO7kYgiMiO3";
});
Now that all of this is done, you should be able to run dotnet run again, hit the /withWebhook endpoint with the same JSON body as before, and get an ID.
curl --location 'http://localhost:5021/withWebhook' \
--header 'Content-Type: application/json' \
--data '{
    "title": "Urlbox",
    "reminder": "2026-02-05T19:00:00.000Z",
    "url": "https://www.urlbox.com/blog"
}'
Use that ID in the GET screenshot method we implemented beforehand, and you'll see the generated screenshot.
This is a great way to render screenshots on a larger scale, particularly if you're worried about tying up processing threads and keeping network requests open for a long time. There are many ways you could improve this, run these in cron jobs to batch requests during off-peak times. You could extend the /withWebhook method to accept a list of options you could pass yourself, including the webhook Url itself.
Conclusion
You might want to incorporate screenshots into your ASP.NET Core application for many reasons. In this article, you've seen how you can use different NuGet packages to take screenshots of a website locally. You also saw the benefit of using a screenshot service like Urlbox. With it, you can take ad-free, high-quality screenshots with minimal effort in an ASP.NET Core application. Finally, you learned how to use the webhook feature provided by Urlbox to take screenshots asynchronously.
If you're looking for an easy, quick, and reliable way to create high-quality screenshots that stand out, look no further than Urlbox.