There are many reasons that you might need to capture screenshots programmatically in a Laravel application, but as a Laravel developer, your options can be limited, especially if you'd prefer not to rely on extensive JavaScript.
The most common way of programmatically capturing screenshots is using JavaScript code to control a web browser instance in the background, but using JavaScript to capture website screenshots in your Laravel application comes with its drawbacks. For many developers, there will be a learning curve. It also requires that you code and maintain a Node.js package. There are Laravel alternatives that you can use in your application to help you code faster and cut the development and maintenance time.
In this article, you will explore several ways of automating screenshot capturing using Laravel, along with code implementation for each method. You'll look at screenshots taken using each of these methods to get a better idea of their pros and cons.
Use Cases
There are a number of use cases in which you might need to automate screenshot capturing within your Laravel application. The whole application can be wrapped around this feature or it can be one of the many features that your application offers. Examples of common use cases include:
- Allowing users of a social network to share links with on-demand, automated thumbnail capturing.
- Developing features that allows users to take screenshots of their app activity to share on social media.
- Building an online directory or archive that requires the availability of constantly updated website homepage images.
- Taking screenshots in a web-based staff management system for reporting purposes.
- Generating screenshots for testing.
Setup
To follow up with the following examples, you need to have PHP 8.0+ and Composer installed on your testing machine. With these installed, navigate in your terminal window to the folder in which you would like to create a project. Create the project using the following command:
composer create-project laravel/laravel screenshots-with-laravelWait a few seconds for the project to be created, then navigate to the newly created project folder and you will be ready to follow up with the tutorial.
Taking Screenshots Using a Node.js Package Wrapper
Coding and maintaining a wrapper package to cover all the features of a Node.js package is a time-consuming task. To avoid having to write JavaScript code, this example will use the Browsershot PHP package.
Browsershot is a PHP wrapper package for the commonly used Node.js package Puppeteer. Puppeteer provides a JavaScript API that controls a Chrome browser in headless mode.
Install the Browsershot package with the following command:
composer require spatie/browsershotSince Browsershot uses Puppeteer behind the scenes, you need to have Node.js and NPM installed on your machine. You also need to install Puppeteer by running the following command:
npm i puppeteer --saveNext, you'll create the controller:
php artisan make:controller BrowsershotController
The controller will be created inside your project folder at the path app/Http/Controllers//BrowsershotController.php. Open the controller file and add the following code at the top to import the Browsershot package:
use Spatie\Browsershot\Browsershot;
After adding the previous code, create a method in the controller class to include the logic of taking screenshots using Browsershot:
    function screenshotTest() {
        Browsershot::url('https://www.nytimes.com/')
                ->setOption('landscape', true)
                ->windowSize(1600, 1024)
                ->waitUntilNetworkIdle()
                ->save(storage_path() . '/laravel_screenshot_browsershot.png');
    }
Browsershot offers a number of options, of which five are being used to take the screenshot:
Browsershot::url('https://www.nytimes.com/')is used to set the URL to be screenshotted.->setOption('landscape', true)sets the page orientation as landscape.->windowSize(3840, 2160sets the window size.->waitUntilNetworkIdle()->waitUntilNetworkIdle()waits for the network activity to stop so you ensure that all the resources are loaded.->save(storage_path() . '/laravel_screenshot_browsershot.png')sets the path where the image will be saved on your server.
In whole, the controller will look like this:
<?php

namespace App\Http\Controllers;

use Illuminate\Http\Request;
use Spatie\Browsershot\Browsershot;

class BrowsershotController extends Controller
{
    function screenshotTest() {
        Browsershot::url('https://www.nytimes.com/')
                ->setOption('landscape', true)
                ->windowSize(3840, 2160)
                ->waitUntilNetworkIdle()
                ->save(storage_path() . '/demo_laravel_screenshot2.png');
    }
}
Add a new route to the routes/web.php file:
Route::get('/test-screenshot-with-browsershot', 'App\Http\Controllers\BrowsershotController@screenshotTest');
Now, run the local development server with Laravel CLI:
php artisan serveFinally, open the page on your browser to test the function:
http://127.0.0.1:8000/test-screenshot-with-browsershot
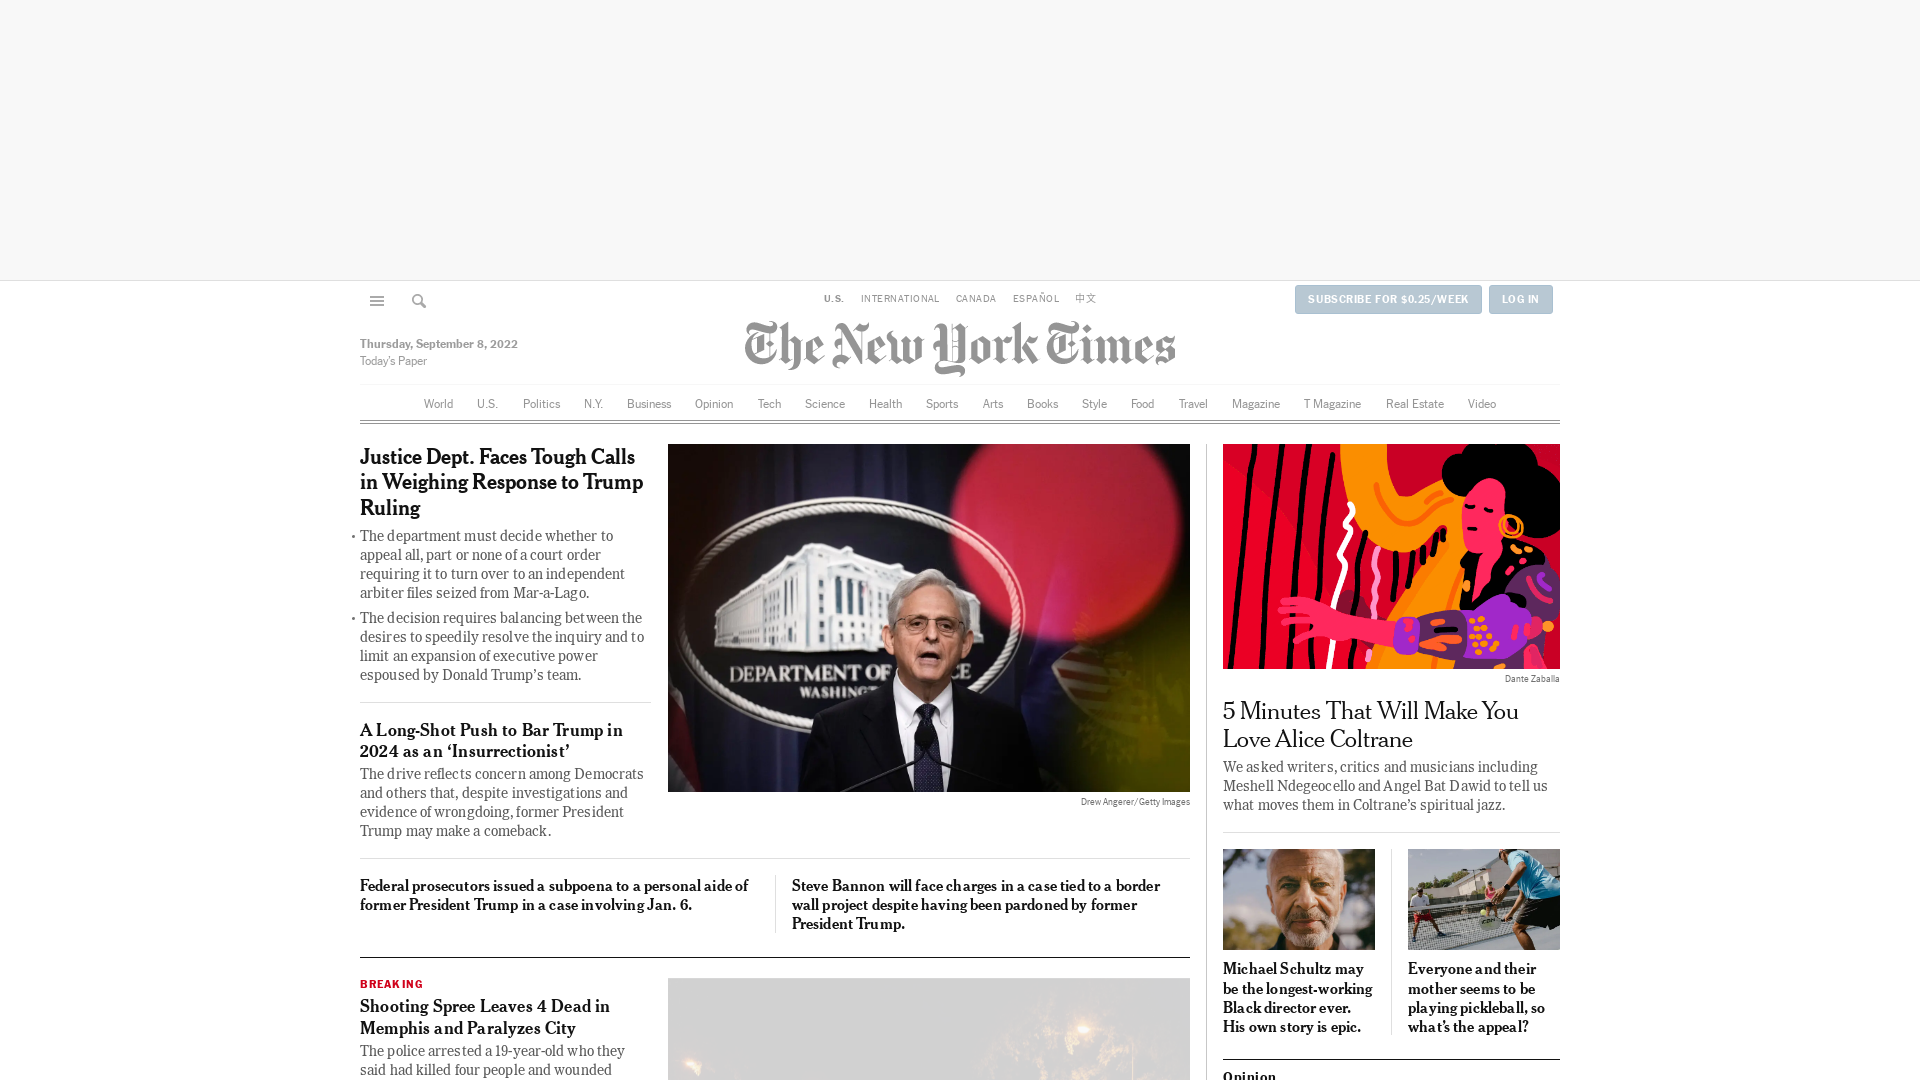
The quality of the image is acceptable. However, you can see that though the ad itself hadn't yet loaded when the capture was taken, the top ad banner covers a large area of the image. Browsershot relies on the Puppeteer Node.js package as a dependency. This adds a new layer of maintenance, since your Node.js version and the Puppeteer package need to be always up to date.
One major drawback of this method is that the screenshot capturing code runs on your server. This may not be a big deal if the screenshot feature isn't used often, or is only used for testing purposes. However, if your application relies heavily on this feature, using Browsershot as a dependency can take up a lot of your machine resources. In many cases, developers end up creating a microservice to handle the image capturing operations.
Taking Screenshots Using PHP-Chrome
PHP-Chrome is a PHP package that allows you to programmatically control a Chrome/Chromium instance in headless mode. This eliminates the need to rely on a Node.js dependency.
You can build on the same project that was created earlier, in the setup section.
Navigate to the project folder in your terminal window, and run this command:
composer require chrome-php/chromeCreate a new controller to execute the screenshot capturing using Chrome-PHP:
php artisan make:controller PHPChromeController
The controller will be created at the path app/Http/Controllers//PHPChromeController.php. Open this file and add the following code to import the PHP-Chrome package:
use HeadlessChromium\BrowserFactory;
Open the controller file at app/Http/Controllers//PhpChromeController.php and add the following code before the controller class to import the PHP-Chrome package:
use HeadlessChromium\BrowserFactory;
Create a method in the PhpChromeController class that includes the logic to take a screenshot using PHP-Chrome:
function ScreenshotTest() {
        $browserFactory = new BrowserFactory();

        $browser = $browserFactory->createBrowser(['windowSize'   => [1920, 1000]]);

        try {
            $page = $browser->createPage();
            $page->navigate('https://www.bbc.co.uk/')->waitForNavigation();
            $page->screenshot()->saveToFile(storage_path() . '/php_chrome_screenshot.png');
        } finally {
            $browser->close();
        }
    }
The function uses the following steps to capture a screenshot:
$browserFactory = new BrowserFactory()creates an instance of the Chrome browser. This might not work on a production server which adds the requirement of installing a Chromium browser.- `$browser = $browserFactory->createBrowser(['windowSize' => [1920, 1000]]) creates the browser and sets the window size.
$page->navigate('https://www.bbc.co.uk/')->waitForNavigation()navigates to the requested page and waits for the network activity to stop.$page->screenshot()->saveToFile(storage_path() . '/php_chrome_screenshot.png')takes the screenshot and sets the path to save the image.
When you're done, the controller should look like this:
<?php

namespace App\Http\Controllers;

use Illuminate\Http\Request;
use HeadlessChromium\BrowserFactory;

class PhpChromeController extends Controller
{
    function ScreenshotTest() {
        $browserFactory = new BrowserFactory();

        $browser = $browserFactory->createBrowser(['windowSize'   => [1920, 1000]]);

        try {
            $page = $browser->createPage();
            $page->navigate('https://www.bbc.co.uk/')->waitForNavigation();
            $page->screenshot()->saveToFile(storage_path() . '/php_chrome_screenshot.png');
        } finally {
            $browser->close();
        }
    }
}
Add the following route to the routes/web.php file:
Route::get('/test-screenshot-with-php-chrome', 'App\Http\Controllers\PhpChromeController@ScreenshotTest');
Now you can run the local development server with Laravel CLI:
php artisan serveOpen http://127.0.0.1:8000/test-screenshot-with-php-chrome in your browser to test the function.
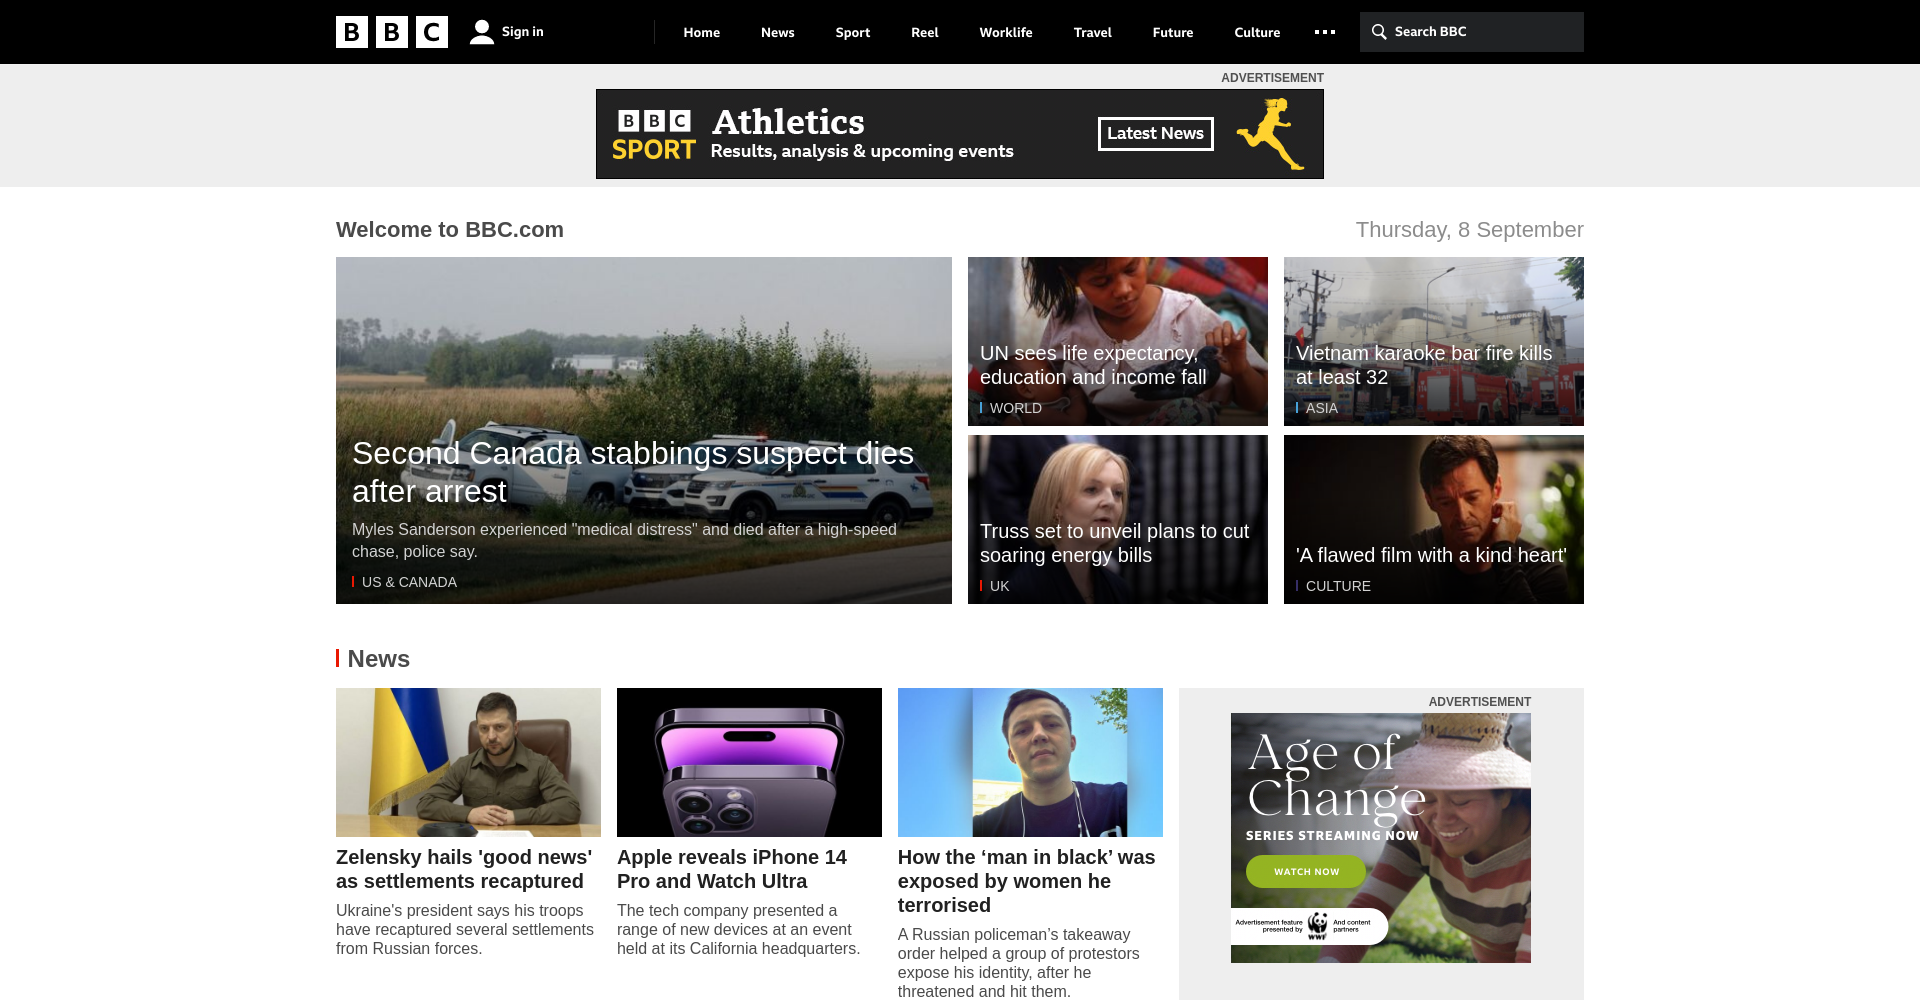
Using Chrome-PHP eliminated the need to rely on Node.js dependencies for screenshot capturing. However, you will still run the image capturing process on your server by controlling a browser. As before, there are ads taking up a substantial portion of the screen real estate, and if you'd like to dismiss banners or pop-ups, you'll need to learn how to programmatically control a Chrome/Chromium browser, which may have a steep learning curve.
Taking Screenshots With Laravel Dusk
Laravel Dusk is an official browser automation testing package developed and maintained by Laravel. It is a powerful testing tool that can be used to take screenshots by controlling a headless version of the Chrome browser.
Run the following command to add the Laravel Dusk package as a dependency:
composer require --dev laravel/duskOnce the dependency is added, you can install Laravel Dusk to your project by running this Artisan command:
php artisan dusk:installThis command creates a folder called Browser in your tests directory. Inside the Browser folder, you'll find the screenshots folder, where the screenshots taken by Laravel Dusk are saved, and an example class created by the dusk
command.Open the file ExampleTest.php inside the tests/Browser folder. An example test named testBasicExample() is already created inside the exampleTest class. Edit this method to look like this:
public function testBasicExample()
{
	$this->browse(function (Browser $browser) {
            $browser->visit('https://www.howtogeek.com/')
            ->screenshot('home-page-screen-test');
	});
}
When you're done, the class will look like this:
<?php

namespace Tests\Browser;

use Illuminate\Foundation\Testing\DatabaseMigrations;
use Laravel\Dusk\Browser;
use Tests\DuskTestCase;

class ExampleTest extends DuskTestCase
{
    /**
     * A basic browser test example.
     *
     * @return void
     */
    public function testBasicExample()
    {
        $this->browse(function (Browser $browser) {
            $browser->visit('https://www.howtogeek.com/')
            ->screenshot('home-page-screen-test');
        });
    }
}
In this function, you've used two of the many options that Laravel Dusk offers:
$browser->visit('https://www.howtogeek.com/')sets the URL you’ll take a screenshot of.->screenshot('home-page-screen-test')sets the image file name.
Run the local development server with Laravel CLI:
php artisan serveRun the Laravel Dusk test command:
php artisan dusk
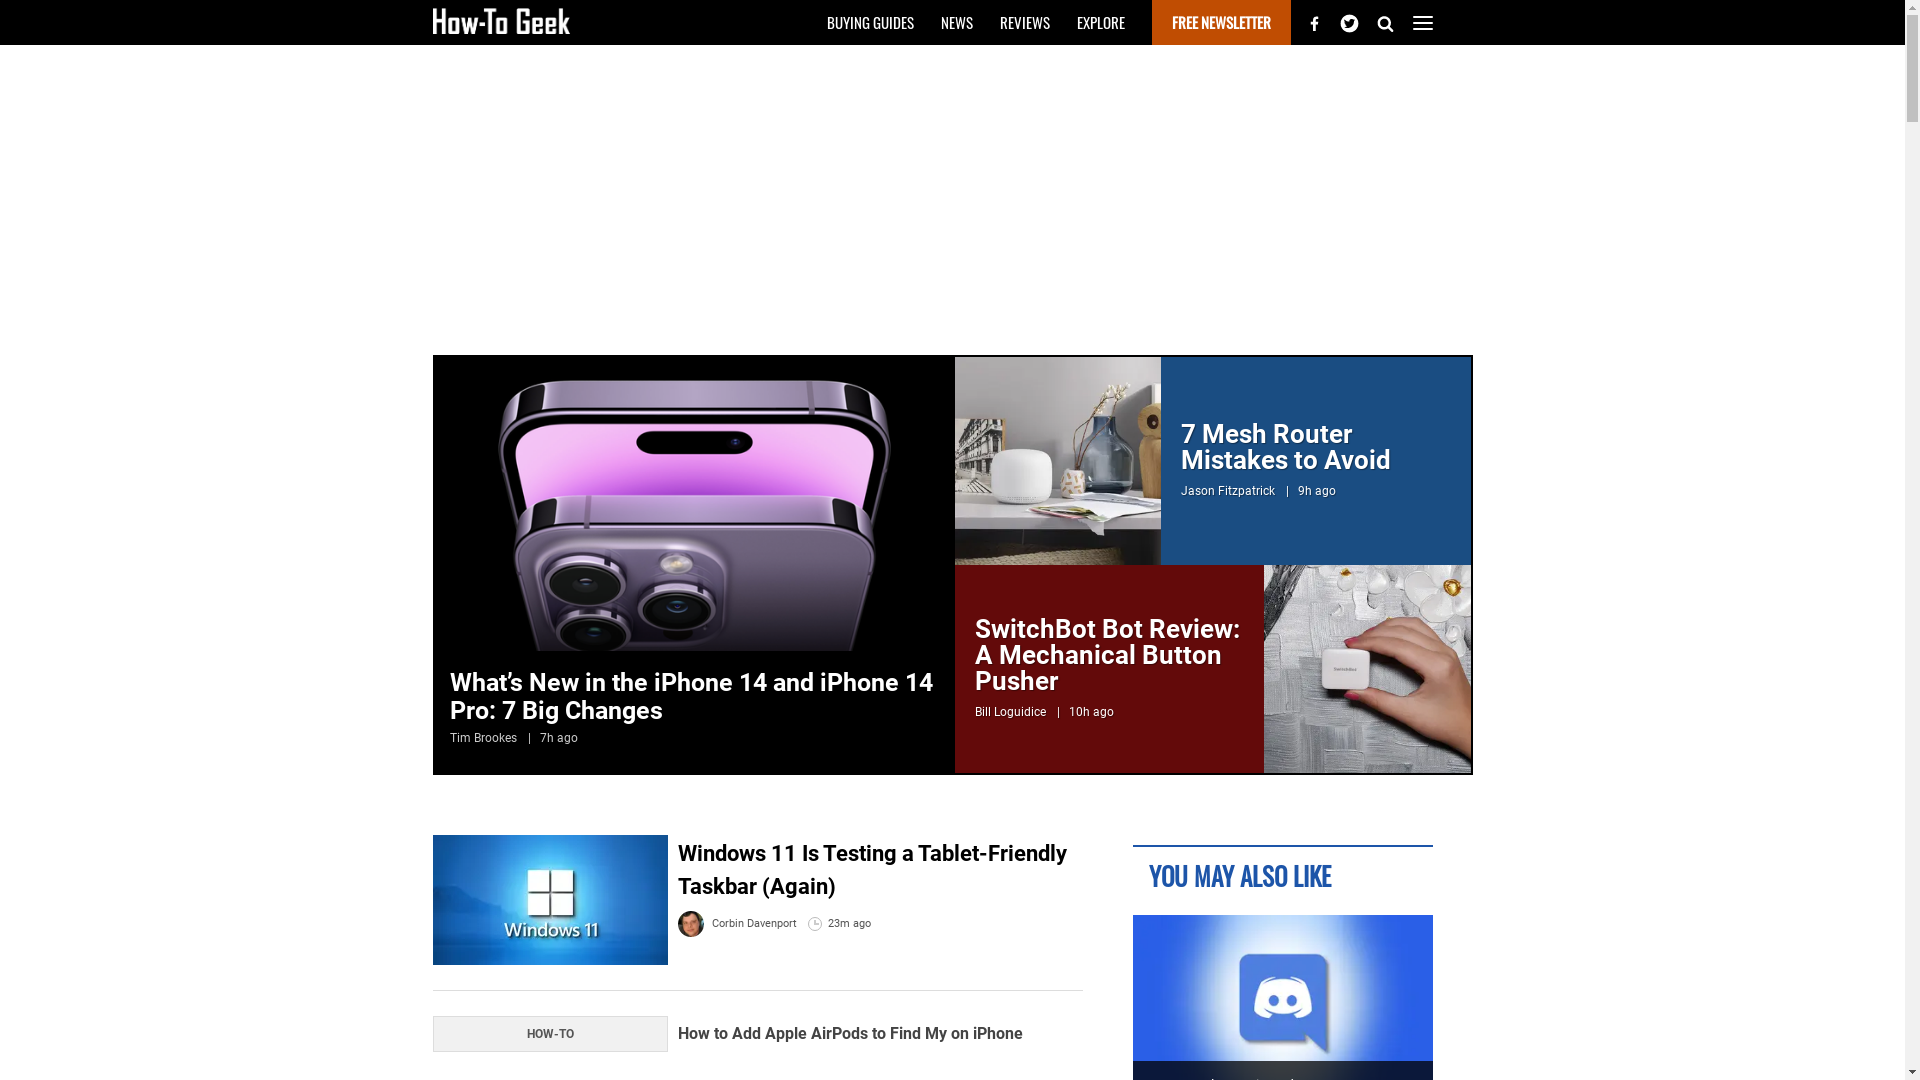
Laravel Dusk provides a great way to take screenshots for browser automation testing. It can automatically create tests for your application routes, create multiple browsers, interact with forms, test authentication and, of course, take screenshots. However, because capturing screenshots of external websites isn’t the use case it was created for, Dusk won’t help with ad blocking or pop-up blocking, as you can see in the screenshot captured.
It is not recommended to use Laravel Dusk for any purpose other than testing. Using Dusk in production environments can compromise your application's security, because it will allow anyone to log in through the routes created for the authentication testing. This explains why the package was installed as a "--dev" dependency earlier in this example.
Taking Screenshots with Urlbox
Urlbox provides a powerful API to take screenshots on both testing and production servers. In addition to the regular screenshot capturing feature, Urlbox provides a webhook feature that allows your application to capture a large number of screenshots asynchronously, then receive a notification a screenshot is rendered.
To get started, sign up for a free trial to obtain an API key and API secret. After logging in, you will find the API and Secret keys that you will use in your account dashboard.
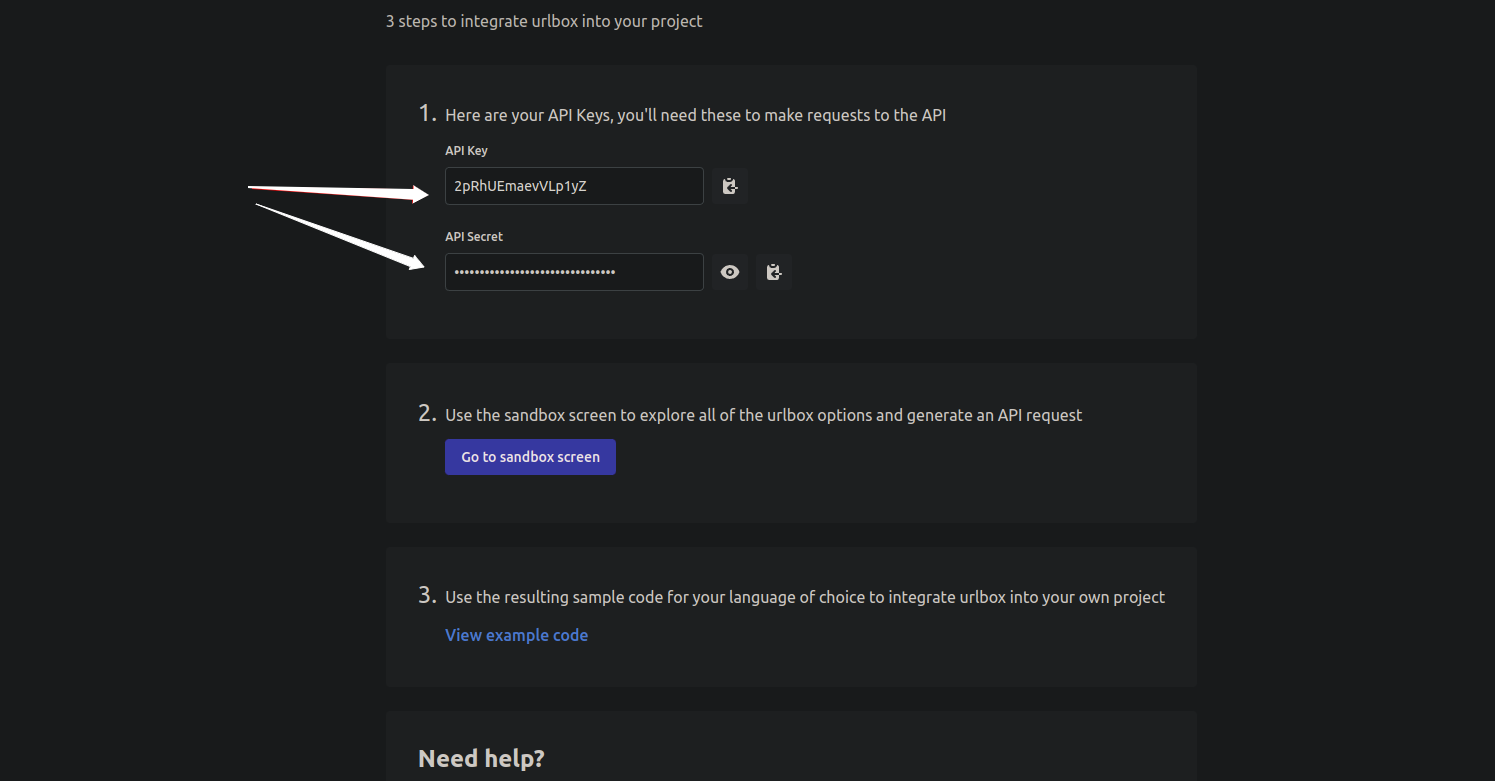
Install the package with the following command:
composer require urlbox/screenshotsAdd your Urlbox API key and API secret key to the .env file:
URLBOX_API_KEY=ADD-YOUR-API-KEY-HERE
URLBOX_API_SECRET=ADD-YOUR-API-SECRET-HERE
Replace ADD-YOUR-API-KEY-HERE with your API key and ADD-YOUR-API-SECRET-HERE with your API secret.
Create the controller:
php artisan make:controller UrlBoxController
Open the controller file that you've just created at the path app/Http/Controllers//UrlBoxController.php and add the following code before the class.
use Urlbox\Screenshots\Urlbox
use Illuminate\Support\Facades\Storage;
The first line of this code imports the Urlbox package, and the second line imports the Laravel storage driver so you can save the image to the local storage.
Create the function that will contain the logic of taking a screenshot using Urlbox:
function ScreenshotTest() {
        $urlbox = Urlbox::fromCredentials(env('URLBOX_API_KEY'), env('URLBOX_API_SECRET'));

        $options['url'] = 'https://www.bbc.co.uk/';
        $options['width'] = 1920;
        $options['block_ads'] = true;
        $options['hide_cookie_banners'] = true;
        $urlboxUrl = $urlbox->generateSignedUrl($options);

        echo '<img src="'.$urlboxUrl.'" alt="Test screenshot generated by Urlbox">';

        $image_file = file_get_contents($urlboxUrl);
        Storage::disk('local')->put('screenshot_with_urlbox.png', $image_file);
    }
The function uses the following steps to capture a screenshot:
$urlbox = Urlbox::fromCredentials(env('URLBOX_API_KEY'), env('URLBOX_API_SECRET'))adds the API key and secret credentials that you previously added to the.envfile for API authentication.$options['url'] = 'https://www.bbc.co.uk/'sets the URL that you would like to capture. The URL option is the only required parameter for the API request to work. If you ignore the following options, the API request will still run.$options['width'] = 1920sets the screen width to 320 pixels.$options['block_ads'] = trueblocks the ads displayed on the page to capture.$options['hide_cookie_banners'] = truehides the cookie banners.$urlboxUrl = $urlbox->generateSignedUrl($options)generates the API request URL.echo '<img src="'.$urlboxUrl.'" alt="Test screenshot generated by Urlbox">'wraps the image captured by Urlbox in an HTML<img>tag and displays it.$image_file = file_get_contents($urlboxUrl) Storage::disk('local')->put('screenshot_with_urlbox.png', $image_file)gets the image file and saves it to your storage.
The controller should look like this:
<?php

namespace App\Http\Controllers;

use Illuminate\Http\Request;
use Urlbox\Screenshots\Urlbox;
use Illuminate\Support\Facades\Storage;

class UrlBoxController extends Controller
{
    function ScreenshotTest() {
        $urlbox = Urlbox::fromCredentials(env('URLBOX_API_KEY'), env('URLBOX_API_SECRET'));

        $options['url'] = 'https://www.bbc.co.uk/';
        $options['width'] = 1920;
        $options['block_ads'] = true;
        $options['hide_cookie_banners'] = true;
        $urlboxUrl = $urlbox->generateSignedUrl($options);

        echo '<img src="'.$urlboxUrl.'" alt="Test screenshot generated by Urlbox">';

        $image_file = file_get_contents($urlboxUrl);
        Storage::disk('local')->put('screenshot_with_urlbox.png', $image_file);
    }
}
Add a new route to the routes/web.php file:
Route::get('/test-screenshot-with-urlbox', 'App\Http\Controllers\UrlBoxController@ScreenshotTest');
Run the local development server with Laravel CLI:
php artisan serveOpen a browser window and open http://127.0.0.1:8000/test-screenshot-with-urlbox to test the function:
Once the image is rendered, you will have an image file saved on your server, and another image saved in the cloud by Urlbox. The locally saved screenshot image file will be at the storage/app folder, and the URL generated by Urlbox will be in this format:
https://api.urlbox.com/v1/API_KEY/TOKEN/png?url=website-url.com
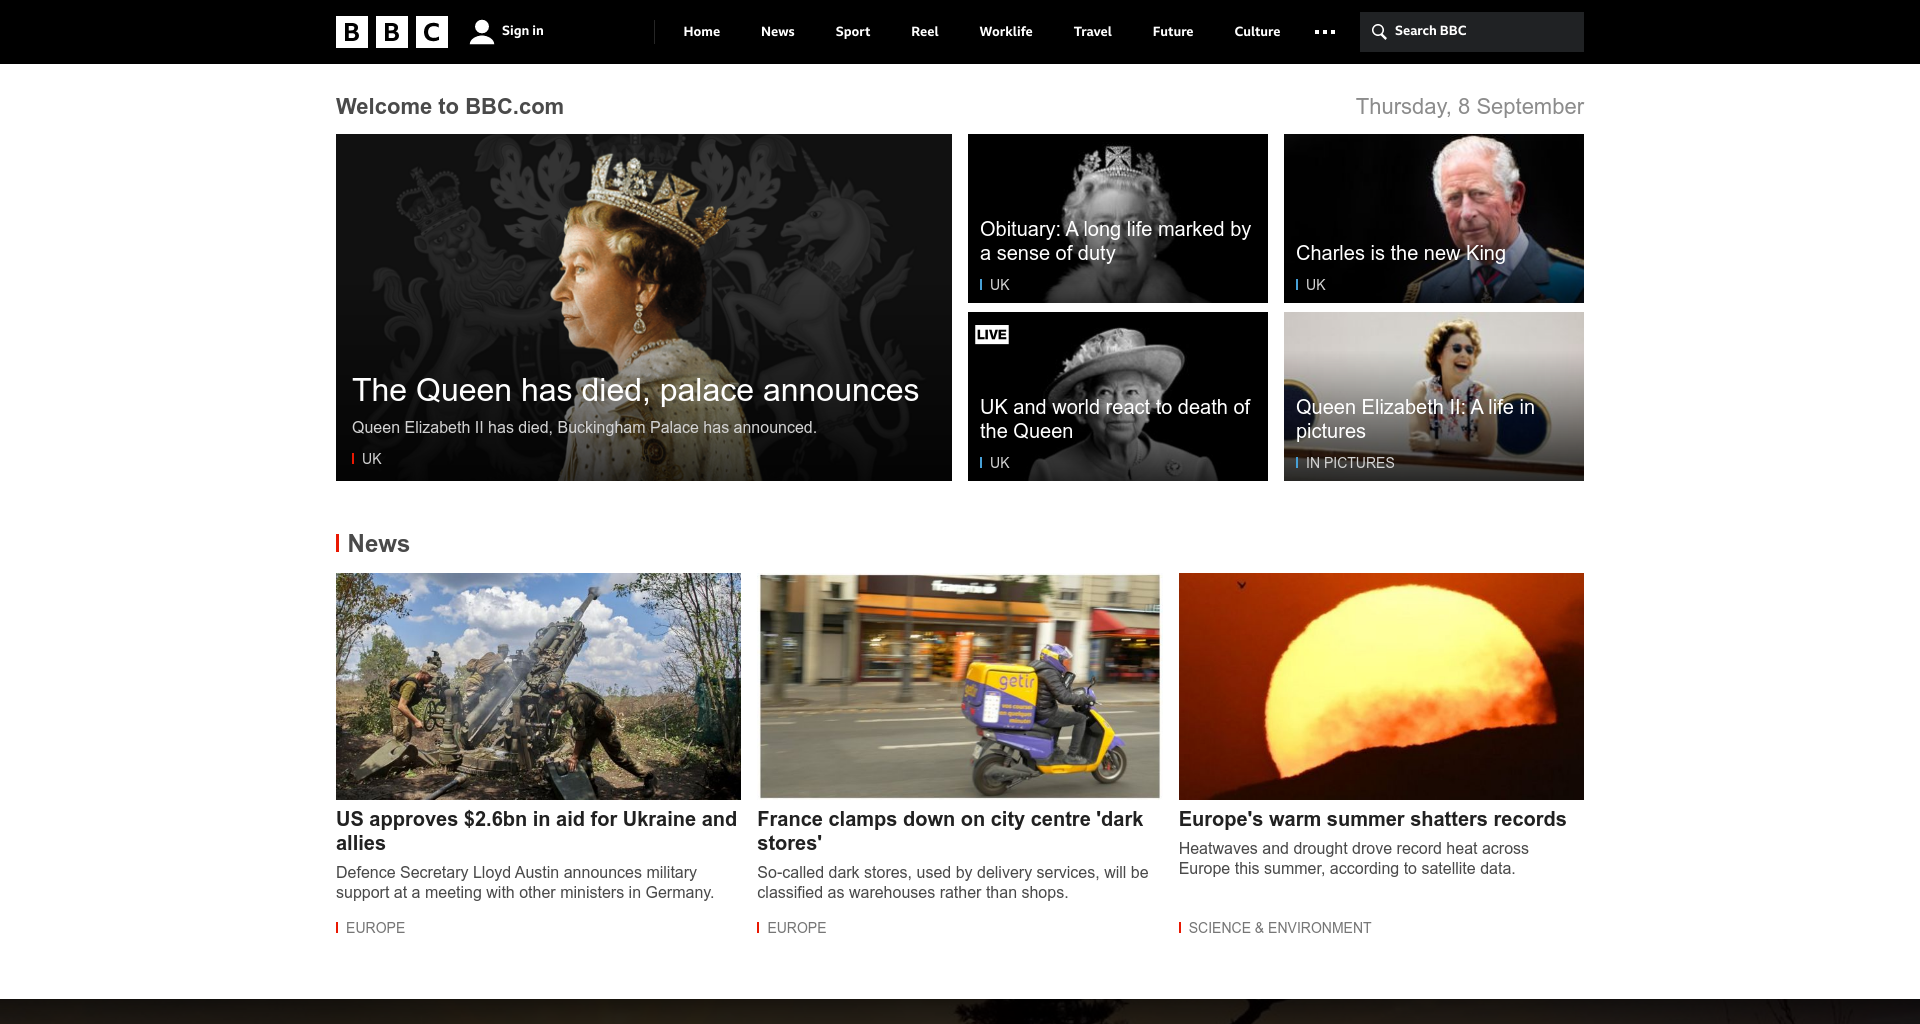
As you can see, this example is a clean, uncluttered screenshot. In this example, you've used relatively minimal options to generate the screenshot, but there are many other Urlbox options available. These include capturing high-DPI retina images, capturing a full page, hiding cookie banners, and automatically clicking buttons to dismiss pop-ups.
By using Urlbox in the previous example, you didn’t have to install a Node.js package or configure and control a browser to handle the operation of capturing the screenshot. This saves much of the precious development and maintenance time. It also saves the infrastructure cost that comes with the heavy use of the screenshot capturing function you are developing.
Conclusion
Adding automated screenshot capturing to a Laravel application can be done in many ways, mostly by using Node.js code or using a PHP package that acts as a wrapper for a Node.js package. The most commonly used Node.js package is Puppeteer. Another way is to use a PHP library that provides an API to control a Chromium browser. Finally, using Urlbox API provides the most straightforward way to take screenshots with no need to maintain dependencies or control a browser instance.
Urlbox API is the most efficient way to automate screenshot capturing. It eliminates the need to code in JavaScript, rely on a long list of dependencies, or control any Chrome browser installations. It provides a simple API loaded with features like ad-blocking, pop-up blocking, and cookie banner blocking. By using Urlbox, screenshot capturing can be scaled and run asynchronously. The options for storing images are also expanded. You can either use the images immediately, save them to your local server, or configure S3 storage to store images captured by asynchronous requests and use webhooks to get your application notified once a screenshot is rendered.
