
How to Take Automatic, High-Quality Screenshots of Login Protected Sites
Urlbox makes it easy to take high quality website screenshots automatically, but have you ever wanted it to be logged in for them? Maybe you want to accumulate some internal dashboards or gather your paywalled articles? There are a few different ways we can achieve this with Urlbox. In this article we'll cover how to:
- Copy cookies from a browser session and use them with Urlbox
- Include a token as a URL parameter
- Use Basic HTTP Authentication
- Use authentication headers.
You can also log Urlbox in by injecting custom JavaScript or you can fetch the HTML yourself on your server and have Urlbox render it, although both are beyond the scope of this article.
Tokens as a URL Parameter
Warning: If a site officially supports this method of authentication, you should be able to assume it's been safely implemented on the backend. However, if you're considering implementing this for your own site, I'd generally recommend using an Authorization header instead; see the next section.
One of the simplest ways to authorise Urlbox is with a URL parameter. Just add a question mark, followed by the keys and values to the end of the url option as normal. Here's an example:
curl -X POST \
  https://api.urlbox.com/v1/render/sync \
  -H 'Authorization: Bearer eb31005e820b40b2b34461a698b2b34d' \
  -H 'Content-Type: application/json' \
  -d '
{
  "url": "https://non-existent-email-details-page.example.com/email/4568?unrelated_value=bar&email_token=PKsh4mmR9HS9qOfA",
  "full_page": true,
  "block_ads": true
}
'Tip: If you're using Node.js, URL objects are a good way to work with URL parameters. For example, here's how you can dynamically set the email_token:
const urlObjToRender = new URL(
  "https://non-existent-email-details-page.example.com/email/4568?unrelated_value=bar"
);
urlObjToRender.searchParams.set("email_token", generateEmailToken());
const urlToRender = urlObjToRender.toString();

// Use urlToRender in a Urlbox request...
The Authorization Header and Authorising Urlbox on Your Own Site
With the exception of the built in HTTP authentication schemes which I'll get to in a minute, browsers don't send Authorization headers when requesting a webpage. So the probably few websites that support this kind of authentication likely do so to enable automatic services like Urlbox, and if it's officially supported, should have API documentation for it. If the site does support it, you can set the Authorization header Urlbox uses with the header option. If the site supports using a JWT for example, you normally use the Bearer scheme like this:
curl -X POST \
  https://api.urlbox.com/v1/render/sync \
  -H 'Authorization: Bearer eb31005e820b40b2b34461a698b2b34d' \
  -H 'Content-Type: application/json' \
  -d '
{
  "url": "https://non-existent-authorization-header-demo.example.com",
  "full_page": true,
  "block_ads": true,
  "header": "Authorization=Bearer eyJhbGciOiJIUzI1NiIsInR5cCI6IkpXVCJ9.eyJ1c2VybmFtZSI6IlRlc3QiLCJlbWFpbCI6ImRlbW8yQGV4YW1wbGUuY29tIiwiaWF0IjoxNzIxMTM4Mjk0LCJleHAiOjE3MjExMzkxOTR9.19ErlqIDiEtlh_Mbx5JGBNB2_KDFk84kfx8fBGKS0bA"
}
'
If you're able to change what credentials the site accepts, I'd advise authorising Urlbox using a rotating temporary token in an Authorization header. If this isn't possible or you judge the risk of the token being leaked to be minimal, you can also use a static token. This approach is generally more secure than using a URL parameter as it's more likely to be treated as sensitive by your server (and so shouldn't be logged for example). As always, make sure you follow security best practices.
Built in HTTP Authentication
As mentioned earlier, there is a situation where browsers send an Authorization header in a webpage request and that's when a site uses built in HTTP Authentication. I couldn't find any stats on its use but it causes the browser itself to display a username and password popup which I rarely see. But if the site you want to screenshot uses it (or possibly supports it without telling the browser), here's how it works…
There are two main schemes for built in HTTP Authentication: Basic and Digest, and since Basic is simpler and seems to be more popular, I'll focus on that. To authorise Urlbox, all we do is add an Authorization header with this format:
Basic <username>:<password>
Where the username, password and separating colon are base64 encoded.
If you're wondering how this works in the browser, it's because I've skipped a stage here. Normally the user would first try to access a page without an Authorization header, resulting in a 401 and a WWW-Authenticate response header. This header contains at least one combination of a scheme name and its options (a challenge), which in this case is Basic and a realm option which describes to the user the part of the site they're signing into. Although the realm is now largely a historical artefact due to its phishing potential. Anyway, this challenge in the header results in the username and password prompt, which the browser uses to set the Authorization header on future requests. And since we can easily encode a username and password into an Authorization header ourselves, it's much easier to bypass this stage of the authorisation flow.
So if our username is foo and our password is bar, the Authorization header would be this without the base64 encoding:
Basic foo:bar
Then we base64 encode the foo:bar to get the final header value of:
Basic Zm9vOmJhcg==
Then we can have Urlbox include this header with its request like so:
curl -X POST \
  https://api.urlbox.com/v1/render/sync \
  -H 'Authorization: Bearer eb31005e820b40b2b34461a698b2b34d' \
  -H 'Content-Type: application/json' \
  -d '
{
  "url": "https://httpbin.org/basic-auth/foo/bar",
  "full_page": true,
  "block_ads": true,
  "header": "Authorization=Basic Zm9vOmJhcg=="
}
'
If you're interested, MDN has an article on the other authentication schemes.
Session Token Cookies
Unfortunately for us in this case, most sites don't use the previous approaches for their authentication, except maybe on specific pages. This is to increase security and because supporting automatic tools like Urlbox isn't a priority. Instead, most sites use something a bit more custom where the user submits a login form to the server and it returns a session token as a cookie if the details are valid. The browser then sends the cookie with each request instead of the username and password.
Here's a diagram to illustrate how it works with traditional random value session tokens, but the newer approach of JWTs is similar as fundamentally they are just a secret clients store and send instead of a username and password:
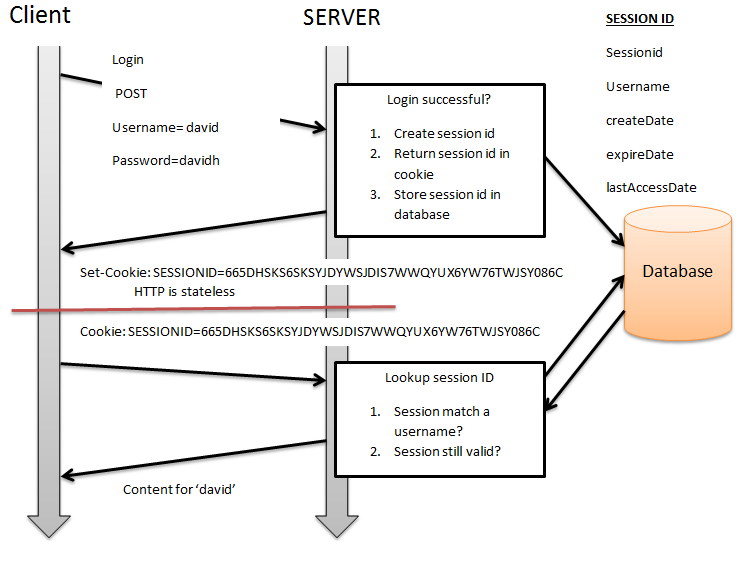
Image credit: AnuragT under CC BY-SA 3.0
Since the session token cookie is what actually authorises a request then, we can just log in manually, get its value and give it to Urlbox. This way we don't need to have Urlbox go through the login process or any other shenanigans. For some sites you might only need to copy one or two of their cookies but I'd recommend copying them all anyway to maximise the chances of this approach working.
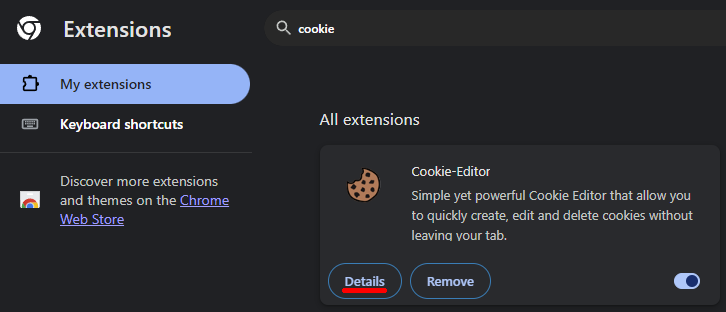
You can do this in DevTools and there's a section below explaining how to do this, but it's quite tedious. Instead, I'll use the open source extension Cookie Editor for this guide and assume you're using Chrome.
Once you've installed the extension, find it in chrome://extensions/ and click on Details.
Then enable Allow in Incognito.
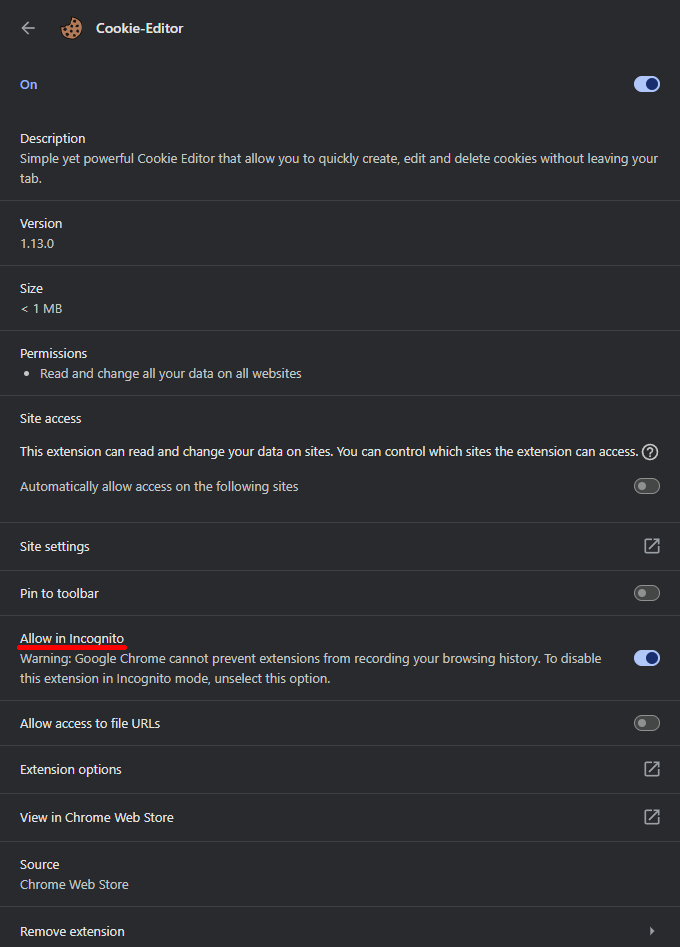
Then open an Incognito tab and log into the site you want to take screenshots of. By using an Incognito tab, the browser will keep the storage separate to your normal tabs, allowing us to log into the site again. It also stops us from accidentally using Urlbox's session once we're done.
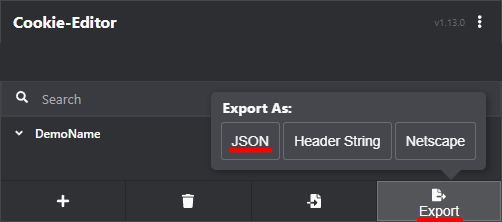
Once you're logged in, click on the Cookie Editor extension, allow access if prompted, click Export then JSON. Next, create a .json file somewhere safe, paste what was copied to the clipboard and close the browser tab as it can cause our session to expire.
Warning: Don't share the cookie files or values with anyone unless you want them to be able to access the account.
If you have a look at the file in a text editor, you'll see that each cookie is an object in a single array and each has a name and value. You should also see some other attributes that might need attention. Since only the names and values are sent to the site we're rendering, these other attributes generally don't matter too much. However, because Urlbox runs a browser and they do use these attributes, it's a good idea to handle them. Here's example of a file with one cookie:
[
  {
    "domain": "localhost",
    "hostOnly": true,
    "httpOnly": false,
    "name": "sessionID",
    "path": "/",
    "sameSite": null,
    "secure": false,
    "session": true,
    "storeId": null,
    "value": "password"
  }
]
In order to set the cookies Urlbox sends with its requests, we can use the cookie option. But since that uses a different format (the same as the Set-Cookie response header) to a cookies.json file, we'll need some code to convert it. Download and extract this starter, then run npm install in the directory. Have a look at the code to see how it works, then set the constants at the top of index.js. If you want to check if it's generating the cookie option correctly without sending a Urlbox request, leave DEBUG_REQUEST set to true and run. Once you're ready to take a screenshot, set DEBUG_REQUEST to false and run with node index.js.
Troubleshooting: If you're doing this in combination with a tunnel, you'll either need to use the tunnel when you originally capture the cookies or update the domain attributes to match the tunnel's domain. If you want to check what cookies are being received, you can change SITE_URL to an echo service like "https://echo-http-requests.appspot.com/echo". Keep in mind that this is also a different domain to what your cookies use. I'd also advise replacing the sensitive cookie values before using the service.
Warning: You should use environment variables instead of hardcoding secrets so you can share your code without leaking them. I'd suggest using dotenv for this and make sure to gitignore the .env file.
Caveats
Unfortunately for us, some sites seem to have more advanced security that can cause some issues. In my testing, some sites displayed a login overlay (over the signed in content) or an entirely logged out view. Since logging in, clearing all of the site's storage and then restoring just the cookies worked in a local browser, I suspect some sort of fingerprinting is being used.
Additionally, the session will usually expire after some time, especially since the Set-Cookie headers the site sends to Urlbox won't change the cookies used for future requests. If the headers are set by the site on the initial request, it isn't too complicated to store and reuse these cookie updates by fetching the initial HTML yourself before your Urlbox request. The starter has an example for this called fetchWithPersistentCookies.js. However, most sites will still log the user out eventually even if their browser is saving cookies correctly, so your mileage may vary.
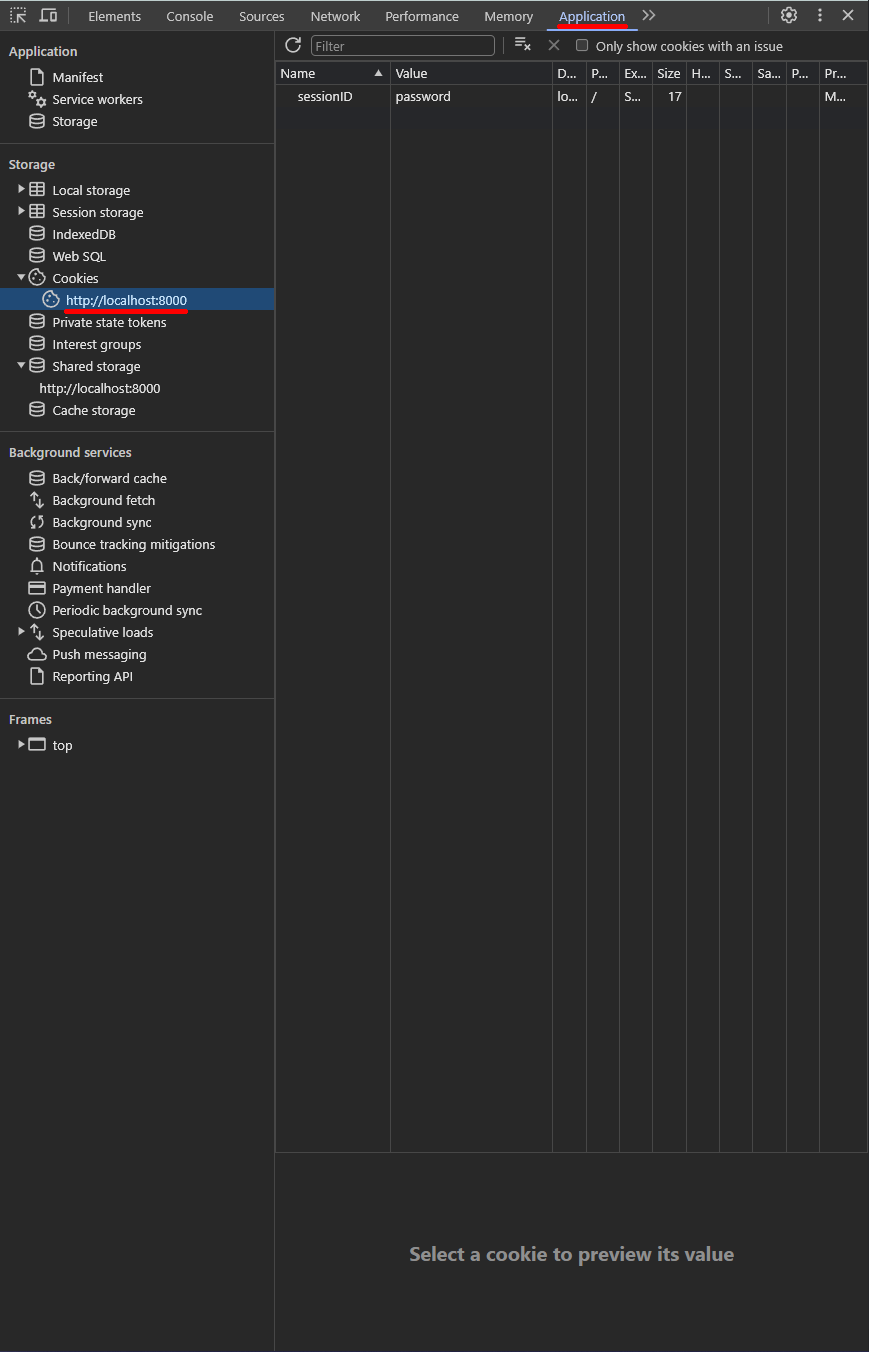
Manual Approach Using Chrome DevTools
If you can't or don't want to install an extension, you can also get the cookies manually through Chrome DevTools, but it can be quite tedious. To do this, log into the site, press Shift + Ctrl/Command + J to open DevTools, go to the Application tab and expand the Cookies dropdown in the Storage section. Then go through the cookies for each origin (the example has all its cookies stored in the origin http://localhost:8000) and copy and paste the names, values and attributes you need. I'd suggest you store this data using the cookies.json template below so you can use the starter.
Here's a cookie.json template. Copy and paste the object to add another cookie:
[
  {
    "domain": "",
    "hostOnly": false,
    "httpOnly": false,
    "name": "",
    "path": "/",
    "sameSite": null, // If it's "None" in DevTools use "no_restriction" here
    "secure": false,
    "session": true,
    "storeId": null,
    "value": ""
  }
]
Conclusion
There are a number of different ways to authorise Urlbox on a site. If it's your own site, use a temporary token in an Authorization header. If it's an existing site, specific pages might support using a token in a URL parameter, otherwise manually log in and clone your cookies. And some sites support the less secure Basic HTTP Authentication, making things even easier.